• Sign Up! To view all forums and unlock additional cool features

    Welcome to the #1 Explorer ST Forum and Explorer ST community dedicated to Explorer ST owners and enthusiasts. Register for an account, it's free and it's easy, so don't hesitate to join the Explorer ST Forum today!


Dashcam install (heavy pics)

Messages
10
Reactions
7
Points
2
Location
Hamilton, ON, Canada
Vehicle
2022 Ford Explorer ST - Atlas Blue
#41
Haven't had an issue with my Blackvue 900x. It has the built in voltage monitor.
Thanks @Lightning Struck, the Thinkware also has a voltage monitor and I will be setting it to not go below 12V but I believe many Ford vehicles now have a built in voltage monitoring as well, wanted to make sure it won't impact anything else and potentially leave me stranded somewhere. I always have a portable battery booster in the vehicle just in case but always good to prevent issues down the road.
 

Messages
453
Reactions
227
Points
37
Location
Davidson County, NC
Vehicle
2021 ST
#42
Great write up I did almost exact same install.

For anyone looking at a F/R camera consider Thinkware Q800PRO.

The entire Thinkware line up is good.
Best Buy has the front Q800PRO at $199.99 with free shipping, today!
 

Last edited:
Messages
453
Reactions
227
Points
37
Location
Davidson County, NC
Vehicle
2021 ST
#43
Re: ground. In the driver's side footwell, underneath fusebox, there is already a grounding bolt on the side wall. Access is limited so you just want to loosen it enough to fit a spade terminal in there. It's right behind the big wire loom. In the pics below, the black wire with yellow terminal is my dash cam ground.

View attachment 9014 View attachment 9015
How in the world were you able to reach that? When I couldn’t figure it out, I used the brake pedal bolt as shown previously.
 

Messages
453
Reactions
227
Points
37
Location
Davidson County, NC
Vehicle
2021 ST
#44
Thanks @Lightning Struck, the Thinkware also has a voltage monitor and I will be setting it to not go below 12V but I believe many Ford vehicles now have a built in voltage monitoring as well, wanted to make sure it won't impact anything else and potentially leave me stranded somewhere. I always have a portable battery booster in the vehicle just in case but always good to prevent issues down the road.
Any issues yet? Just installed mine today and wonder whether I need the expensive external battery.
 

Messages
339
Reactions
114
Points
37
Location
Oregon
#45
Which always hot fuse did you end up using?
 

Messages
453
Reactions
227
Points
37
Location
Davidson County, NC
Vehicle
2021 ST
#46
Which always hot fuse did you end up using?
I used 29 and 37 as shown in the wonderful first post tutorial. I stuck the wires under the fuse legs until fuse taps arrive tomorrow.
 

Messages
339
Reactions
114
Points
37
Location
Oregon
#47
I used 29 and 37 as shown in the wonderful first post tutorial. I stuck the wires under the fuse legs until fuse taps arrive tomorrow.
Is 29 constantly hot, and 37 is hot with ignition, or the other way around?
 

Cdubya

1000 Post Club
Messages
1,469
Reactions
717
Points
262
Location
NE Ohio
Vehicle
2020 Explorer ST
#49
You do not need smaller fuses if your hardwire kit has in-line fuses for ACC and Batt+ already--most dash cam and radar detector hardwire kits do.

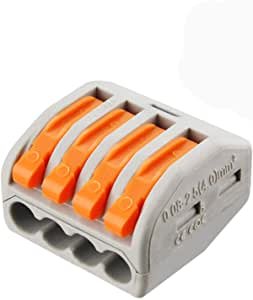
I would also recommend terminating your ACC, Batt+ and GND with a Wago lever nut. Makes for multiple easy, fast, secure connections in case you add something like a radar detector later. You can also use these for household electrical switches/boxes.
61l91-Ive3L.__AC_SX300_SY300_QL70_ML2_.jpg
 

Messages
3
Reactions
2
Points
1
Location
Kansas
Vehicle
22 Exploer ST
#50
How in the world were you able to reach that? When I couldn’t figure it out, I used the brake pedal bolt as shown previously.
I used 1 of the 2 bolts located under the side panel. My garmin camera liked it.
 

R2D2

Member
Messages
293
Reactions
210
Points
37
Location
LA, California
Vehicle
2022 Explorer ST
#51
I have the viofo A119 dual cam from my last car(without any hard wiring kit). I wanted to keep the same setup in the new ST.

Trying to figure out, if any of the 12v sockets, power off when I turn the vehicle off. I don't want the always-on motion sensing camera recordings. And possiblity of a drained battery if I park for extended period.

Edit: Thanks a lot for the OP for taking your time and effort in making the first post..
 

Messages
239
Reactions
143
Points
37
Location
Sacramento, CA
Vehicle
2022 ST
#52
I have the viofo A119 dual cam from my last car(without any hard wiring kit). I wanted to keep the same setup in the new ST.

Trying to figure out, if any of the 12v sockets, power off when I turn the vehicle off. I don't want the always-on motion sensing camera recordings. And possiblity of a drained battery if I park for extended period.

Edit: Thanks a lot for the OP for taking your time and effort in making the first post..
here is my install page for my radar and dash cam.

https://www.explorerst.org/threads/another-mirror-tap-diy-radar-dash-cam.4422/
 

MaverickX

New Member
Messages
18
Reactions
8
Points
2
Location
Port Moody, BC
Vehicle
2022 Explorer ST
#53
I used 1 of the 2 bolts located under the side panel. My garmin camera liked it.
Hi there! I am in the process of installing a new BlackVue DR-900X Dual Channel dashcam in my ST. I have figured out proper fuses to tap off (#37 - acc - for run mode and #4 - batt - for parking). However, I am having difficulties finding a point to get GND from. Could you please share some photos of your ground connection, or just describe it more in detail?
Thank you!
 

Messages
453
Reactions
227
Points
37
Location
Davidson County, NC
Vehicle
2021 ST
#54
I am having difficulties finding a point to get GND from. Could you please share some photos of your ground connection, or just describe it more in detail?
Thank you!
IIRC, I used one of the brake pedal mounting bolts. If there’s something like Harbor Freight up in BC, this gadget is great to have and will help you find a solid grounding point.

https://www.harborfreight.com/612v-circuit-tester-with-5-ft-lead-63603.html
 

Messages
453
Reactions
227
Points
37
Location
Davidson County, NC
Vehicle
2021 ST
#55
This is the bolt I used. If you follow the metal tube to which your brake pedal is attached, you’ll find it.

2F41C47F-6D5D-4FFE-B226-53B44B6AD818.jpeg
 

MaverickX

New Member
Messages
18
Reactions
8
Points
2
Location
Port Moody, BC
Vehicle
2022 Explorer ST
#56
This is the bolt I used. If you follow the metal tube to which your brake pedal is attached, you’ll find it.

View attachment 16000
Thank you very much!
I have a Cirquit-Test digital multimeter. I did find those brake pedal mounting bolts, but I just thought they were a bit far from the fuse box. But it looks like there's nothing with reliable ground closer. I'll use one of those bolts as you recommend. Thanks again.
 

Messages
453
Reactions
227
Points
37
Location
Davidson County, NC
Vehicle
2021 ST
#57
Thank you very much!
I have a Cirquit-Test digital multimeter. I did find those brake pedal mounting bolts, but I just thought they were a bit far from the fuse box. But it looks like there's nothing with reliable ground closer. I'll use one of those bolts as you recommend. Thanks again.
I think the best choice is the bolt shown in post #34. But, I just couldn’t get to it. The one I used seems to keep the ground wire high enough to avoid damage and I had plenty of wire available.
 

st8

1000 Post Club
Messages
1,064
Reactions
467
Points
212
Location
Bel Air, MD, USA
#58
Love the write up! I am planning to install a dashcam into my 2022 this weekend. I do have one question though...do you have any issues with the battery? Most new dashcams have voltage meters so I know it won't be too much of an issue but just wanted to see if it was causing any long term issues for those that have had a camera installed for a while.
Actually just had this come up recently. Checked my ford pass app and got a deep sleep message. First time in 12k miles of ownership. I have a garmin dash cam with a special adapter from garmin. My car started fined and when I checked my dash cam, the batter was nearly dead. So it worked in cutting power To the camera to spare the car battery, but it still had an effect.
 

MaverickX

New Member
Messages
18
Reactions
8
Points
2
Location
Port Moody, BC
Vehicle
2022 Explorer ST
#59
I think the best choice is the bolt shown in post #34. But, I just couldn’t get to it. The one I used seems to keep the ground wire high enough to avoid damage and I had plenty of wire available.
It looks like that bolt may or may not be there. It is not there on my ST. :(
 

R2D2

Member
Messages
293
Reactions
210
Points
37
Location
LA, California
Vehicle
2022 Explorer ST
#60
The photo shows that I pulled the rubber boot off the white plastic flange. One of the flanges popped out easily, but the other fought me with a death grip. The photo shows that the white flange has 4 different grips, so now you know where you can put pressure with your trim tool.
I tried this and failed few times now.
I could not even get one side out to see how it is looking inside. The location itself is a bit inaccessible.

It feels like I'm going to break the trim pry tool before the rubber bellows and the white flanged seat comes out. Any tips/pointers, how to proceed?
 

Explorer ST Posts


Top