Here is my procedure to install the Viofo A129 Duo front/rear dashcam. My Mustang also has this same exact setup, so I already knew for a year that I was satisfied with its performance, features, and reliability.
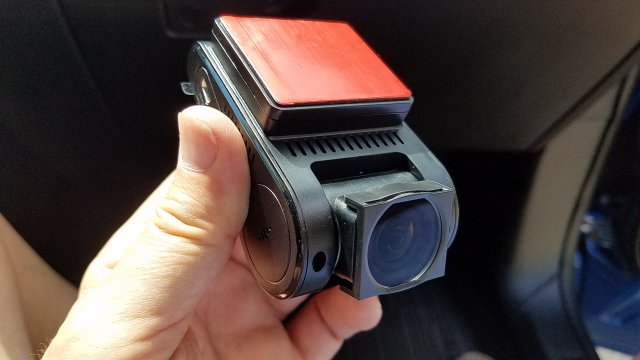
The Viofo has a great Parking Mode in my opinion. There are several options just for parking mode. It automatically switches into and out of parking mode with a couple of chirps to announce the change. I run 5 or 10 fps during parking mode, and I just verified that it recorded 15 hours of video between two car starts without ever switching off due to low (car) battery voltage. The photo above shows the available Polaroid filter snapped onto the lens. It really helps improve the image. The camera is available in 4k resolution, but I've found the 1080p version to be sufficient for my needs.
The Viofo HK3 hardwire kit is a must for this camera. It is a 3-wire harness with low voltage monitoring.
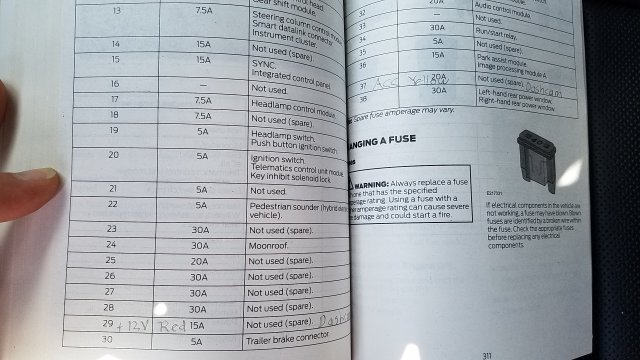
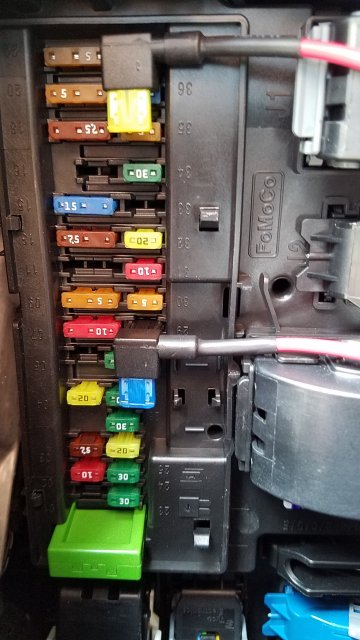
The first challenge was to identify the best fuse # choices in the fusebox. I used the owner manual together with probing the fuses to identify always-on and ignition-switched-on fuses.
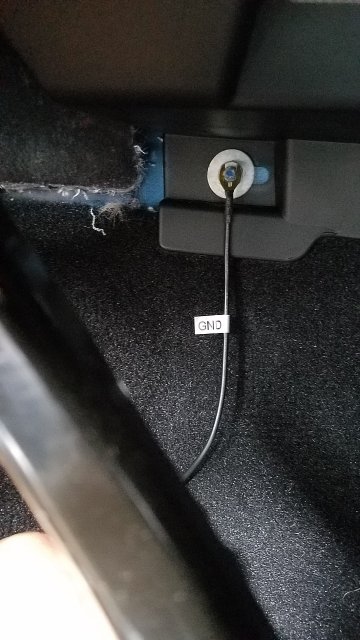
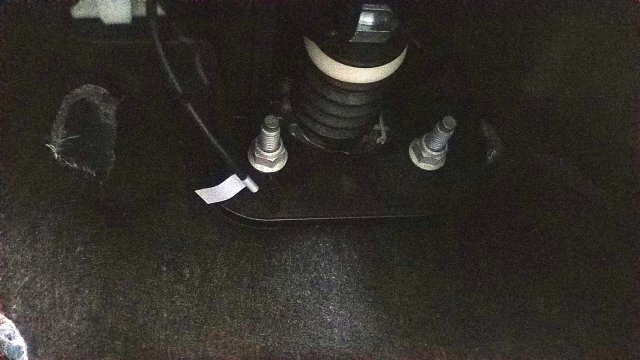
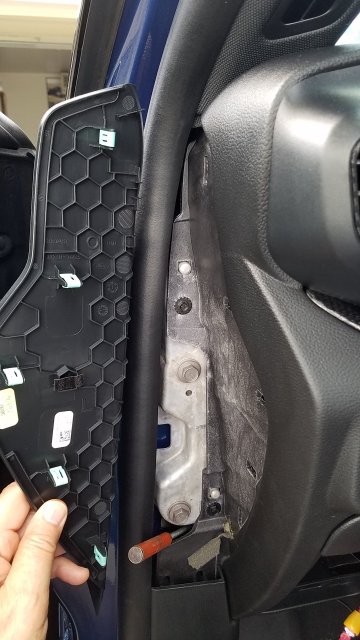
I also needed to identify a good ground source. One stud above the pedals seemed good at first, but I did not get a bright light with my tester. Do not use this stud pictured below!
For a stupid check, I connected my tester across the battery and saw a bright light. This tester came with an dashcam install kit which also included fuse taps, plastic install levers, etc, for about $12.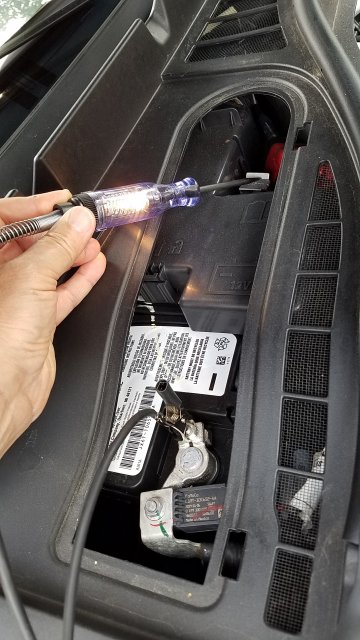
So I switched over to a larger stud and that one gave a bright light.
I installed my two fuse taps to fuse# 37 (Accessory) and fuse# 29 (Always On). Both of these are spare fuses (unassigned)! The fuse tap leads should go off to the right, because the hot side of the fuse box is on the left and the load side is on the right of each fuse socket. I also used the same fuses that were in those sockets. I did not use extra, smaller fuses. Not technically the best method, but I'm not worried.
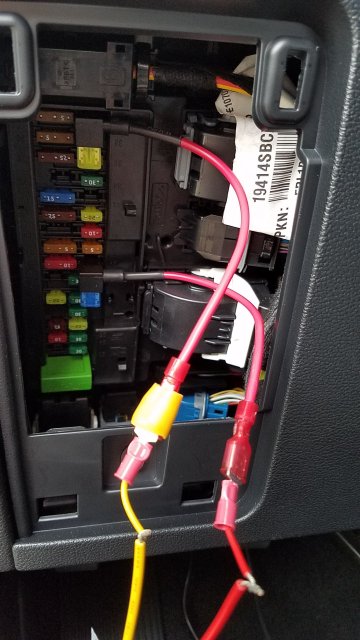
Next I hooked everything up for a test. This was to verify that the red wire truly should go to +12V always-on, and the yellow wire is for switched-on.
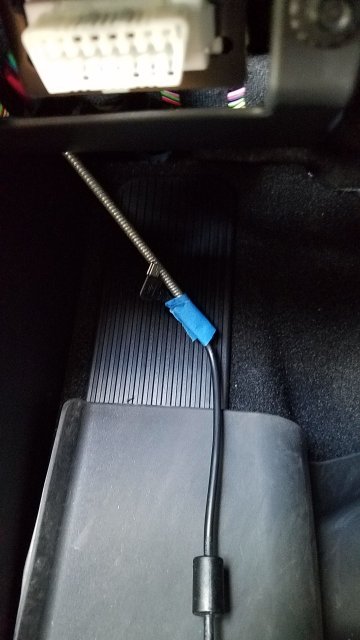
The camera turned on and started recording when I started the car. And I could tell it switched to parking mode when I turned off the car and opened the door. (The fast-ons with stripped ends were leftovers from a previous install. I got lazy and used small wire nuts instead of crimping fresh fast-ons onto the harness leads. The gold ring terminal in the next photo fit the larger ground stud, but the wire opening is ridiculously large so I simply spread the prongs of the factory lug to fit.)
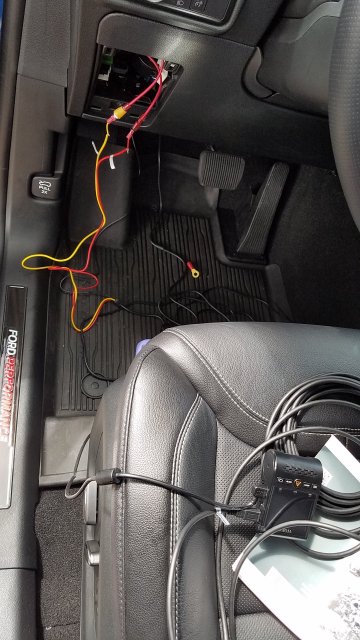
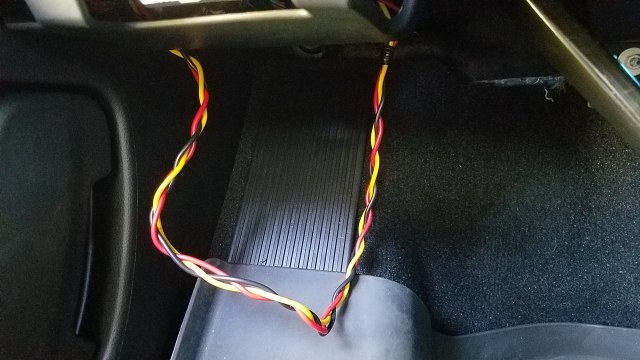
Braided the HK3 red-yellow-black wires, just because.
Then I was ready to run the cable for the front camera. I pulled the cover off the side of the dash. This cover removed easily, because the plastic clips don't grip as hard as Ford's metal clips. I taped the cable to a stick to pull it through the dash. It is the red cylinder in this photo.
I then ran the cable behind the A pillar using the supplied plastic tool. Not too hard this part. Then across and behind the headliner above the driver's position.
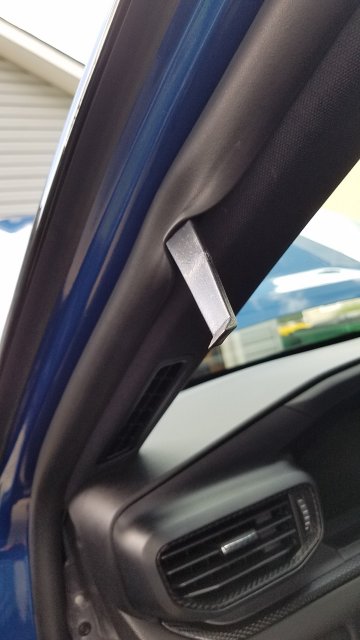
I did not pull down on the center housing at the top of the windshield. I already knew that could spell trouble. Instead I used another trim tool to push the cable into the gap between the housing and the headliner. This tool was a bit more blunt so as not to damage the cable. Yes, you can push it up in there.
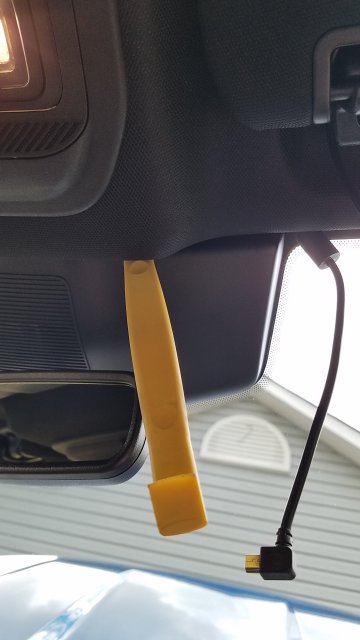
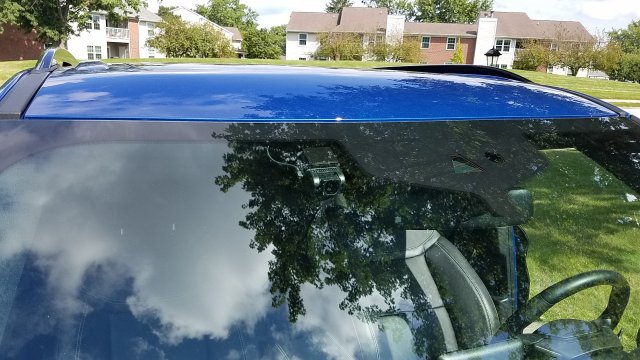
I mounted the dashcam just to the right of the center housing and below the perimeter blackout. I verified that the windshield wiper will reach up that high. I stuck the camera down with the supplied VHB tape after carefully aligning it to be vertical and level. You only get one chance for this step, so you may want to use blue tape on the windshield to define your target beforehand.
There was a nifty location to stick the voltage monitor behind the fusebox cover using double-stick foam tape. It reads upside down, but that was necessary to have access to the voltage switch.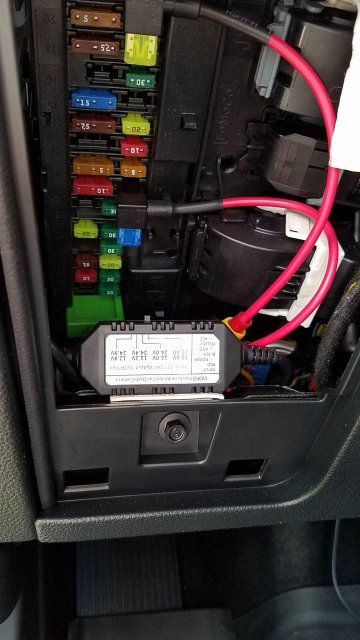
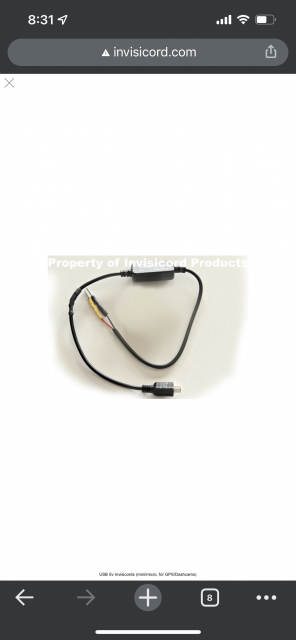
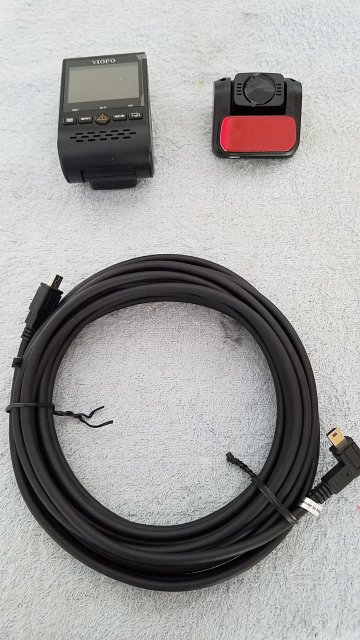
Here is a photo of the world's thickest USB cable. It was troublesome to run it from rear to front. And it took me a couple of hours because I had to figure things out and proceed slow and careful.
Yes, I did run the cable through the rubber bellows at the liftgate. There really weren't any better options. I had to use an official electrician's fishtape in order to succeed, and I had to pull the entire length of the 19-foot cable through this tube forwards because the right-angle USB connector just wouldn't want to pull through there. Besides, I wanted the angled connector at the rear camera, and the straight connector at the front camera. This was opposite to the factory labels.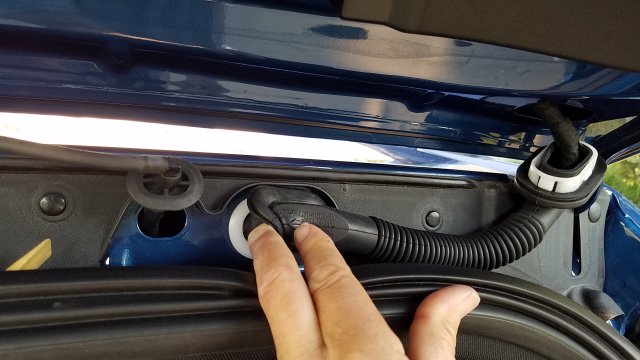
The photo shows that I pulled the rubber boot off the white plastic flange. One of the flanges popped out easily, but the other fought me with a death grip. The photo shows that the white flange has 4 different grips, so now you know where you can put pressure with your trim tool.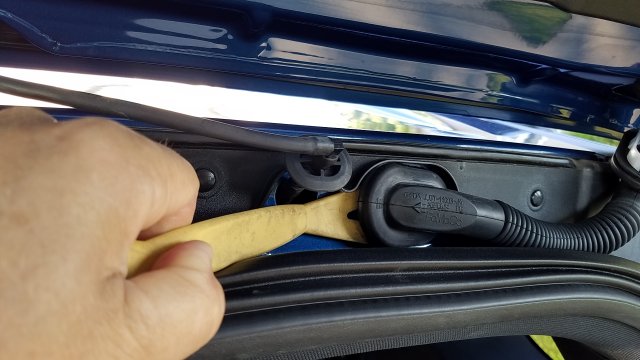
It was tricky routing the cable up to the front in spots. I used the fishtape for the large span around the D pillar under the headliner.
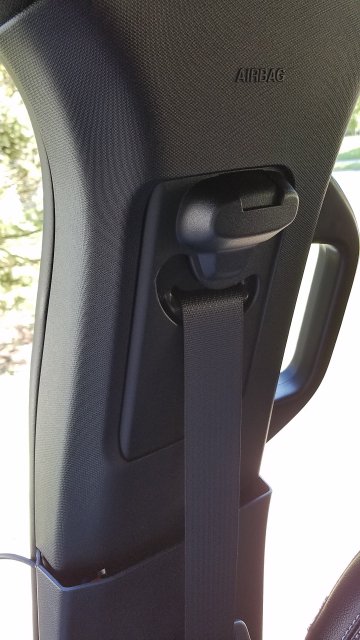
The B pillar had the challenge in that the plastic trim over the seat belt had plastic stiffening ribs at its upper edge that prevented simply stuffing the cable down and behind the trim. So instead I routed the cable straight down a few inches at the rear edge of the trim, and then looped it back up the front edge of the trim. This was a way to get around those ribs. I made sure that it would not snag with the seatbelt behind the trim. Then I continued on to the A pillar, and then across the passenger side headliner to the camera. I had reached my destination!
Yes, there are airbags to be avoided. I just kept the cables at the outer perimeter of the headliner and all was good.
The Viofo has a great Parking Mode in my opinion. There are several options just for parking mode. It automatically switches into and out of parking mode with a couple of chirps to announce the change. I run 5 or 10 fps during parking mode, and I just verified that it recorded 15 hours of video between two car starts without ever switching off due to low (car) battery voltage. The photo above shows the available Polaroid filter snapped onto the lens. It really helps improve the image. The camera is available in 4k resolution, but I've found the 1080p version to be sufficient for my needs.
The Viofo HK3 hardwire kit is a must for this camera. It is a 3-wire harness with low voltage monitoring.
The first challenge was to identify the best fuse # choices in the fusebox. I used the owner manual together with probing the fuses to identify always-on and ignition-switched-on fuses.
I also needed to identify a good ground source. One stud above the pedals seemed good at first, but I did not get a bright light with my tester. Do not use this stud pictured below!
For a stupid check, I connected my tester across the battery and saw a bright light. This tester came with an dashcam install kit which also included fuse taps, plastic install levers, etc, for about $12.
So I switched over to a larger stud and that one gave a bright light.
I installed my two fuse taps to fuse# 37 (Accessory) and fuse# 29 (Always On). Both of these are spare fuses (unassigned)! The fuse tap leads should go off to the right, because the hot side of the fuse box is on the left and the load side is on the right of each fuse socket. I also used the same fuses that were in those sockets. I did not use extra, smaller fuses. Not technically the best method, but I'm not worried.
Next I hooked everything up for a test. This was to verify that the red wire truly should go to +12V always-on, and the yellow wire is for switched-on.
The camera turned on and started recording when I started the car. And I could tell it switched to parking mode when I turned off the car and opened the door. (The fast-ons with stripped ends were leftovers from a previous install. I got lazy and used small wire nuts instead of crimping fresh fast-ons onto the harness leads. The gold ring terminal in the next photo fit the larger ground stud, but the wire opening is ridiculously large so I simply spread the prongs of the factory lug to fit.)
Braided the HK3 red-yellow-black wires, just because.
Then I was ready to run the cable for the front camera. I pulled the cover off the side of the dash. This cover removed easily, because the plastic clips don't grip as hard as Ford's metal clips. I taped the cable to a stick to pull it through the dash. It is the red cylinder in this photo.
I then ran the cable behind the A pillar using the supplied plastic tool. Not too hard this part. Then across and behind the headliner above the driver's position.
I did not pull down on the center housing at the top of the windshield. I already knew that could spell trouble. Instead I used another trim tool to push the cable into the gap between the housing and the headliner. This tool was a bit more blunt so as not to damage the cable. Yes, you can push it up in there.
I mounted the dashcam just to the right of the center housing and below the perimeter blackout. I verified that the windshield wiper will reach up that high. I stuck the camera down with the supplied VHB tape after carefully aligning it to be vertical and level. You only get one chance for this step, so you may want to use blue tape on the windshield to define your target beforehand.
There was a nifty location to stick the voltage monitor behind the fusebox cover using double-stick foam tape. It reads upside down, but that was necessary to have access to the voltage switch.
Here is a photo of the world's thickest USB cable. It was troublesome to run it from rear to front. And it took me a couple of hours because I had to figure things out and proceed slow and careful.
Yes, I did run the cable through the rubber bellows at the liftgate. There really weren't any better options. I had to use an official electrician's fishtape in order to succeed, and I had to pull the entire length of the 19-foot cable through this tube forwards because the right-angle USB connector just wouldn't want to pull through there. Besides, I wanted the angled connector at the rear camera, and the straight connector at the front camera. This was opposite to the factory labels.
The photo shows that I pulled the rubber boot off the white plastic flange. One of the flanges popped out easily, but the other fought me with a death grip. The photo shows that the white flange has 4 different grips, so now you know where you can put pressure with your trim tool.
It was tricky routing the cable up to the front in spots. I used the fishtape for the large span around the D pillar under the headliner.
The B pillar had the challenge in that the plastic trim over the seat belt had plastic stiffening ribs at its upper edge that prevented simply stuffing the cable down and behind the trim. So instead I routed the cable straight down a few inches at the rear edge of the trim, and then looped it back up the front edge of the trim. This was a way to get around those ribs. I made sure that it would not snag with the seatbelt behind the trim. Then I continued on to the A pillar, and then across the passenger side headliner to the camera. I had reached my destination!
Yes, there are airbags to be avoided. I just kept the cables at the outer perimeter of the headliner and all was good.
Last edited:
-
 16
16
- Show All