• Sign Up! To view all forums and unlock additional cool features

    Welcome to the #1 Explorer ST Forum and Explorer ST community dedicated to Explorer ST owners and enthusiasts. Register for an account, it's free and it's easy, so don't hesitate to join the Explorer ST Forum today!


Converting crossmember from 1 bolt to 2

Cruising68

1000 Post Club
Messages
1,393
Reactions
1,033
Points
262
Location
Chicago, IL, USA
#1
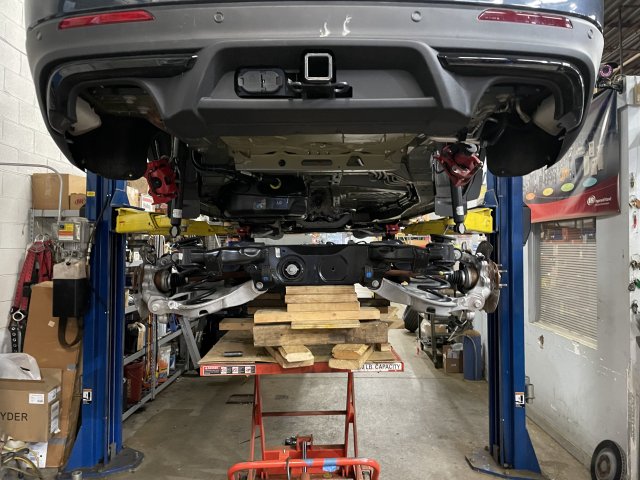
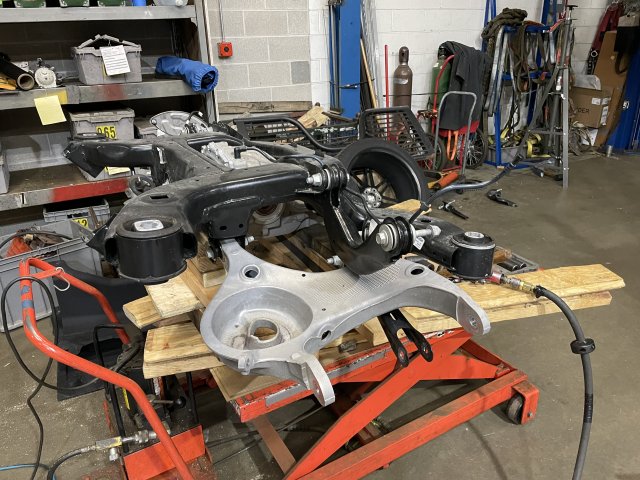
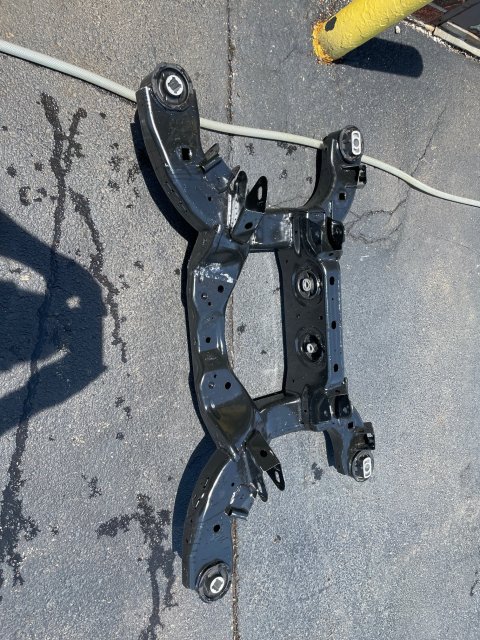
So I finally found some time to tackle this project. I bought a correct crossmeber from Ford with the two bolt bushings. Dealer told me it was an 8 hour job. 8 hours my butt!

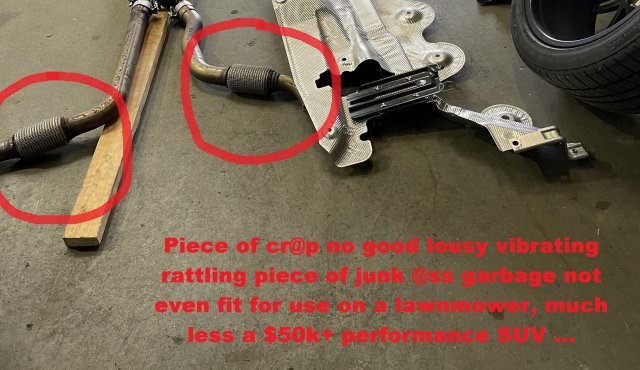
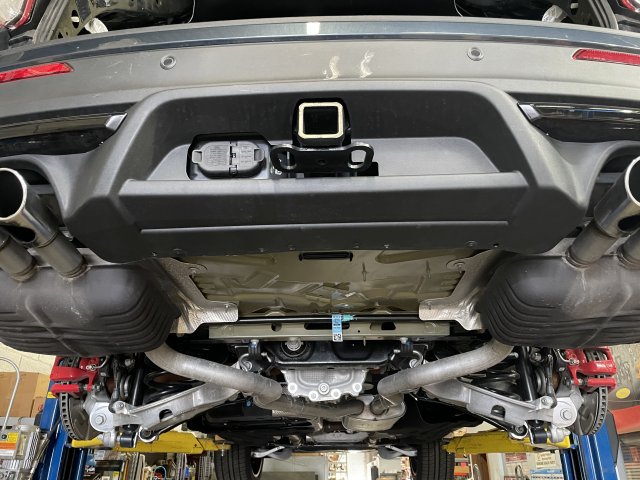
Anyhow. Started by getting the ST on a lift and removing the stock exhaust. Relatively simple since I've only hat it a few months. Good to have the manual or I would have not seen the bolt on the rearmost hangers that has to come out to get the rest of the back portion off.

IMG_4174.jpg IMG_4176.jpg
 

Last edited:
OP
C

Cruising68

1000 Post Club
Messages
1,393
Reactions
1,033
Points
262
Location
Chicago, IL, USA
Thread Starter #2
Next was the driveshaft. Could it be as simple as a few bolts.......nooooooo.
Ford shows you one of a few "special tools" one to remove the driveshaft from the diff. The Ford tool is a bar with a slide hammer that attached to the driveshaft. I made one from a 3.5" exhaust clamp and some square tubing I had lying around. Mind you, I weld for performance, not looks.....in other words I can get it done but it ain't pretty:D

IMG_4178.jpg

To remove the driveshaft you have to remove 6 bolts from the coupler so you have enough room to pull the driveshaft forward. Be sure to mark the original orientation to you can install it the same way. Then remove the middle driveshaft support. Be careful not to articulate the driveshaft much as they say you can break it. I tied it up with coat hangers. to keep it supported and relatively safe. Then you just attach the tool to the rearward end of the driveshaft. There is a groove where the clamp goes. Once you tighten it down you pound on it a few times ans she pops out. Remove and set aside so it doesn't get moves.

IMG_4177.jpg
 

OP
C

Cruising68

1000 Post Club
Messages
1,393
Reactions
1,033
Points
262
Location
Chicago, IL, USA
Thread Starter #3
Next step is to disconnect electrical harness to each wheel and hang each caliper from the body. You don't want the calipers hanging on the hose. I used some S hooks to hold them.

IMG_4185.jpg

Also need to remove the clips for the diff vent. and disconnect the lower rear stabilizer bar links and remove the rear stabilizer.

IMG_4184.jpg

IMG_4187.jpg

Also remove both lower shock bolts.
 

OP
C

Cruising68

1000 Post Club
Messages
1,393
Reactions
1,033
Points
262
Location
Chicago, IL, USA
Thread Starter #4
Now comes the fun part. Fortunately I own a tool company so I have nice tools like this lift table.

Basically support the rear subframe bu the subframe only, not the lower control arms but the subframe itself. Build a little support for the whole shebang.
IMG_4188.jpg

IMG_4189.jpg

IMG_4190.jpg

IMG_4191.jpg
 

OP
C

Cruising68

1000 Post Club
Messages
1,393
Reactions
1,033
Points
262
Location
Chicago, IL, USA
Thread Starter #5
Once it is at ground level it is much easier to work on. The good news it the Steeda springs and swaybar will take about 30 seconds to install once I'm putting it back together.

Removing the knuckle is a minor PITA. Four bolts on the back, remove the big bearing nut, and use a puller to drive the driveshaft our of the knuckle.

IMG_4192.jpg

Some more progress pics.

IMG_4193.jpg

IMG_4194.jpg

IMG_4196.jpg
 

Attachments

Last edited:
OP
C

Cruising68

1000 Post Club
Messages
1,393
Reactions
1,033
Points
262
Location
Chicago, IL, USA
Thread Starter #6
That's where I quit for the night. Worked on it for about 8 hours but two hours were killed finding a 3.5" muffler clamp and making the "special" tool.

So I have 6 into it. Almost got it completely disassembled. I'm hoping it goes together in 4 tomorrow so I can do front springs and DP's along with my Thermal exhaust. I'm not overly optimistic I will get it all done but I have to drive it Monday and pretty sure allignment specs will be way off in the rear.
 

TMac

1000 Post Club
Messages
1,695
Reactions
1,455
Points
262
Location
Knoxville, TN
#7
Impressive....most impressive!
 

OP
C

Cruising68

1000 Post Club
Messages
1,393
Reactions
1,033
Points
262
Location
Chicago, IL, USA
Thread Starter #8
Impressive....most impressive!

She ain't running yet :ROFLMAO:

One other note. Ford basically says to replace every bolt that you remove. Things like shock bolts, caliper bolts, sway bar mount bolts, circlips on the diff splines. It is ridiculous. I replaced all the big bolts that hold the subframe on and plan on re-using most of the rest and I think even that is overkill. If I find one or two in rough shape I will replace them. The only reason I can think of to replace them is if they were torque to yield bolts. I don't see Ford spending that kind of money on basic fasteners where that is not necessary. But then again if they tell you to replace them all they can charge you $400 for bolts. I paid $77 for 8:mad:
 

Last edited:
Messages
65
Reactions
32
Points
17
Location
Elizabeth, NJ, USA
#9
Nice job so far, good luck the rest of the way.
 

Messages
65
Reactions
38
Points
17
Location
Yellowknife, NT, Canada
Vehicle
2022 Ford Explorer ST
#10
Now we know why Ford only wants to do a quick ECM flash as a start on this problem. Great write up!
 

Messages
65
Reactions
38
Points
17
Location
Yellowknife, NT, Canada
Vehicle
2022 Ford Explorer ST
#11
I just dread having to turn my car over to Ford if they decide to replace this part.
 

Dale5403

1000 Post Club
Messages
1,749
Reactions
1,481
Points
262
Location
Mondovi, WI, USA
#12
Nice write up. Looking forward to seeing you doing the home stretch. Hope it goes well.
 

F=MA

Active Member
Messages
908
Reactions
581
Points
232
Location
Wichita, KS, USA
#13
Great write up !! Interesting to see how it all goes together. Approaching 20,000 miles on my 2020 with zero problems....so far....
 

I Bleed Ford Blue

Active Member
U.S. Navy Veteran
Messages
643
Reactions
424
Points
182
Location
Ohio
Vehicle
23 Rapid Red Explorer ST
#14
I think they want you to replace all the bolts because they are pre coated in loc-tite. Just clean the old hardware with a wire wheel and reapply a fresh coat of loc-tite
 

I Bleed Ford Blue

Active Member
U.S. Navy Veteran
Messages
643
Reactions
424
Points
182
Location
Ohio
Vehicle
23 Rapid Red Explorer ST
#15
From the looks of it why couldn't you just unbolt the LCA's and remove the big bolts holding the diff carrier and lift the subframe off the whole assembly? Leaving the axles in place and the knuckle all attached.
 

Messages
298
Reactions
218
Points
37
Location
Utah
Vehicle
2022 Ford Explorer Platinum
#16
This is intense! Great write up! You've convinced me that this is WAY out of my league. I'll let Ford do it when they replace the axles when they finally arrive...
Looking forward to seeing/reading about the rest of your adventures as you complete this project.

Will you be doing a write up like this on the SPD DPs and Thermal exhaust as well? I'll be attempting this in a few weeks and would love to learn from you!
 

CareerFiremanGuy

1000 Post Club
Firefighter/EMT
Messages
1,082
Reactions
790
Points
262
Location
USA
Vehicle
2022 Ford Explorer ST
#17
After seeing the amount of work involved, this project is a big NOPE for me! But I give Cruising68 huge props for doing it.(y)

My only comment comes from this pic he posted ...

Untitled3.jpg
 

OP
C

Cruising68

1000 Post Club
Messages
1,393
Reactions
1,033
Points
262
Location
Chicago, IL, USA
Thread Starter #18
Well day 2 is complete. Let's just say it didn't quite go as planned. more special tools to fabricate. I'll post more details and pics after I get some sleep.

Good news is the crossmenber swap is complete. The Thermal exhaust is on, and all lowering springs are in. Wanted to get the DP's done but those will have to wait for another day. Supposed to get it aligned at 11:30 today but don't see that happening.
 

CareerFiremanGuy

1000 Post Club
Firefighter/EMT
Messages
1,082
Reactions
790
Points
262
Location
USA
Vehicle
2022 Ford Explorer ST
#19
By your detailed account of the swap, I bet more people are being convinced not to do it ...
 

OP
C

Cruising68

1000 Post Club
Messages
1,393
Reactions
1,033
Points
262
Location
Chicago, IL, USA
Thread Starter #20
By your detailed account of the swap, I bet more people are being convinced not to do it ...
In hindsight, I think it would have been well worth the $1300 to have Ford do it haha.


After a day of sleep I figured I would post some updates.

Starting Sunday with a crossmember with only lower control arms. Got that stripped then washed the new crossmember (not sure why) and got ready to see how much I forgot taking it apart.
IMG_4208.JPG

IMG_4211.JPG

IMG_4214.JPG

IMG_4213.JPG
 

Attachments


Top