• Sign Up! To view all forums and unlock additional cool features

    Welcome to the #1 Explorer ST Forum and Explorer ST community dedicated to Explorer ST owners and enthusiasts. Register for an account, it's free and it's easy, so don't hesitate to join the Explorer ST Forum today!


13" sub in factory location and rest of stereo upgrade

Cruising68

1000 Post Club
Messages
1,393
Reactions
1,033
Points
262
Location
Chicago, IL, USA
#1
Figured I would start my own thread instead of cluttering up others'. Now don't get excited, this will NOT be on the level of UNBROKEN as I am a hack compared to him. I am going with Nav TV adapter to two Audio Control DSP amps and an Audio Control Sub Amp. Front will be a mix of Morel and the rear doors will be Hertz. I prefer the sound with at least some rear volume and I'm not planning on any competitions so this is purely for my own listening.

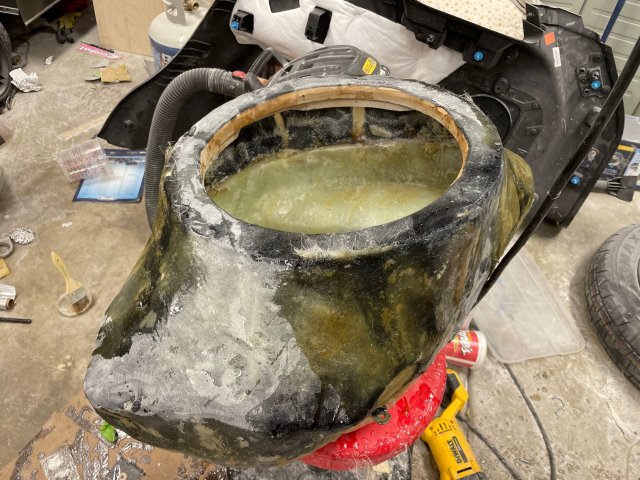
Started with some sound deadening and a JL Audio TW5v3 sub in the factory location. I hacked together a cardboard mold to get the shape I wanted. Built up the layers and mounted it to fasten the brackets to use the factory bolts for installation. Test filled with water and I have more space than I need.

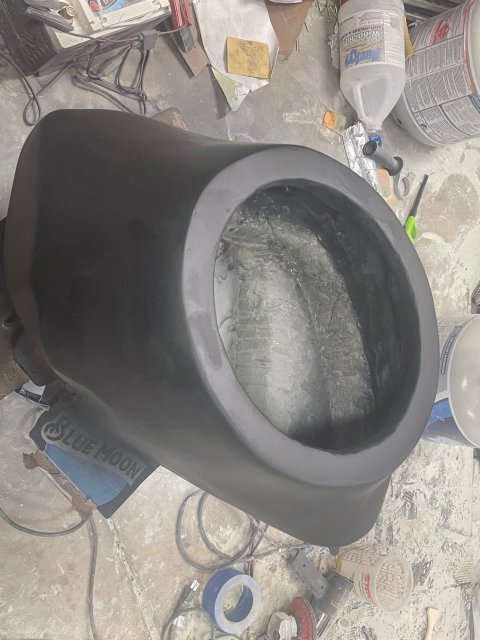
Here are the first presentable pic.
Sub1.jpg

Sub2.jpg

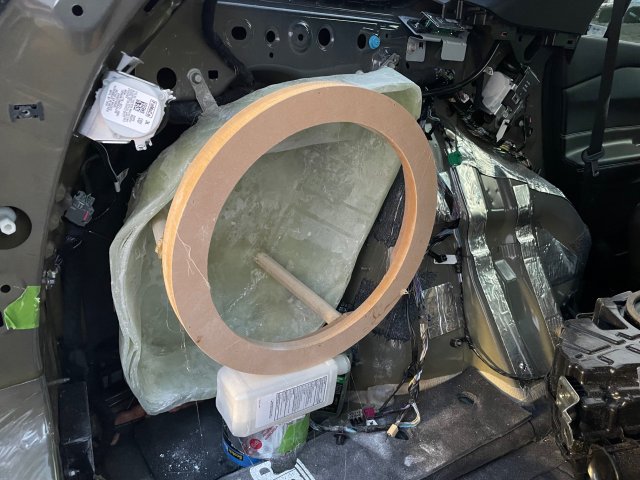
And here it is in place so I could fiberglass the brackets in.

Sub3.jpg

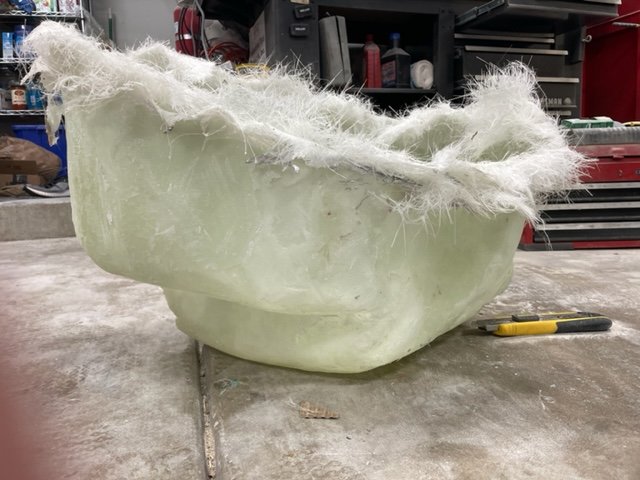
Next I have to calculate the additional space when I install the speaker ring and move the sub out towards the trim panel. Then trim down the shell and start fabbing the face and speaker ring.
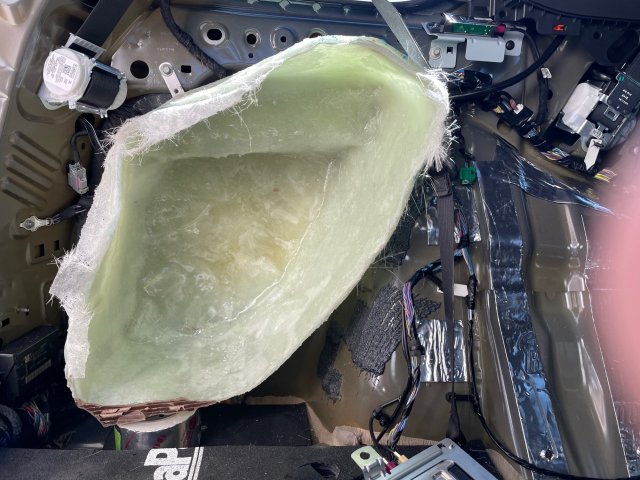
 

OP
C

Cruising68

1000 Post Club
Messages
1,393
Reactions
1,033
Points
262
Location
Chicago, IL, USA
Thread Starter #2
So today I trimmed the box down to an estimated size and tried to fit the plastic panel. No dice. The top of the box is about 1" too high for the panel to fit over. Guess I should have looked at that when I made the form. Anyhow, going to trim it down and apply some more fiberglass then on to the ring.

I think this is about the biggest sub you could fit here. As it is I will be cutting into the panel quite a bit and the ring barely fits on the flat part of the panel and cuts into the vent on the bottom a bit.
 

OP
C

Cruising68

1000 Post Club
Messages
1,393
Reactions
1,033
Points
262
Location
Chicago, IL, USA
Thread Starter #3
Well just posting a quick update. Fiberglass sucks and I suck at fiberglassing.

Did a couple rounds of trimming and re-forming some areas. While I have enough volume, the speaker ring is larger than the dimensions of the box by about 1-2 inches in a couple spots. Since I have about 3-4" from the current face of the box out to the plastic trim panel over the sub, I decided to cut down those areas a bit and shape it up towards the sub ring for a more gentle transition and to make sure there was plenty of room for the speaker.

I am intentionally not posting more pic yet. As I said I suck and am embarrassed at my fiberglass skills:eek: Hopefully I will post a few tomorrow after I get the ring secured and start to fiberglass the face.

In hindsight I think it might have gone a lot better if i got a bit block of Styrofoam and cut it to fit completely in the area. Then carve out what i wanted the shape of the box to be and use that as a mold. My troubles started immediately trying to shape a mold out of cardboard that was not strong enough to do what I needed.
 

TMac

1000 Post Club
Messages
1,696
Reactions
1,455
Points
262
Location
Knoxville, TN
#4
I have a little experience with making custom parts and followed unbroken's A-pillar speaker mounts with interest. His workmanship is excellent, however I think if you look at building small custom parts that don't require aircraft strength, it's easier to use polyurethane foam. They can be easily sculpted and sanded and once you get to 99% of your shape you can then add your resin and fabric. It's a lot easier to sculpt and sand the foam than bondo. This technique can be more expensive, but it's a lot less labor intensive.
 

UNBROKEN

4000 Post Club
Messages
4,248
Reactions
4,957
Points
352
Location
Houston, TX, USA
#5
At some point it’s easier to scrap the first version and start over. Fiberglass is cheap anyway. There’s countless videos on building glass sub enclosures. Personally, and I think your chosen location is perfect, I’d go with the build in place method. Tape off everything behind the enclosure and lay the back wall part. I would probably work in the mounts to the oem spots so they’re part of the enclosure. Mock up a frame for the enclosure face and mount it in place with wooden dowels then pull the whole thing out, stretch fleece between the front and back to bridge the gaps then hit that with a coat of resin. After it hardens go to town with chop mat. You’ll be starting with a much more solid base and the build will go a lot easier from there.
 

OP
C

Cruising68

1000 Post Club
Messages
1,393
Reactions
1,033
Points
262
Location
Chicago, IL, USA
Thread Starter #6
At some point it’s easier to scrap the first version and start over. Fiberglass is cheap anyway. There’s countless videos on building glass sub enclosures. Personally, and I think your chosen location is perfect, I’d go with the build in place method. Tape off everything behind the enclosure and lay the back wall part. I would probably work in the mounts to the oem spots so they’re part of the enclosure. Mock up a frame for the enclosure face and mount it in place with wooden dowels then pull the whole thing out, stretch fleece between the front and back to bridge the gaps then hit that with a coat of resin. After it hardens go to town with chop mat. You’ll be starting with a much more solid base and the build will go a lot easier from there.
Funny you should say that. I have my final fitment tonight where I am installing the box I and dowelling in the speaker ring so i can test the fit with the trim cover. If it fits with minimal trimming I will use it. If it just doesn't fit I will start over and build a better support structure so I can nail the initial shape better.

Thanks for the thoughts. Already burned through two gallons of epoxy :)
 

OP
C

Cruising68

1000 Post Club
Messages
1,393
Reactions
1,033
Points
262
Location
Chicago, IL, USA
Thread Starter #7
Well I got the ring positioned and I'm pretty sure it will fit with the panel on. Now for some fleece and fiberglass. Then I have to see how much volume I end up with. I'm afraid I may have had to trim a bit too much too get it to fit, might have lost too much volume. Trying to make up for a bit of the lost space when I fleece. Lettign the glue dry good and cold and then I will try some fleece. If I don't have enough volume I think I've decided to use the current box as a mold. I can use body filler or cut and fiber to expand in the places I need to expand and then tape and foil it to use as a 3 sided mold for the second attempt. Ring.jpg it of it with the fleece.
 

Last edited:

Chaseg08

Member
U.S. Navy Veteran
Messages
89
Reactions
57
Points
17
Location
Golden, CO, USA
#8
It looks like it will be significantly smaller than .8 cu ft.

Don't get too down on yourself! It's an experience to learn from and gain skill. We all get to learn here too, thanks to you. As Unbroken mentioned, fiberglass is cheap and it may be easier to just start over. It sucks you've dumped time and energy into it but you'll likely be much happier in the end if you start from scratch and incorporate what you've learned from this try. Either way, thanks for contributing and keep us updated.
 

OP
C

Cruising68

1000 Post Club
Messages
1,393
Reactions
1,033
Points
262
Location
Chicago, IL, USA
Thread Starter #9
It looks like it will be significantly smaller than .8 cu ft.

Don't get too down on yourself! It's an experience to learn from and gain skill. We all get to learn here too, thanks to you. As Unbroken mentioned, fiberglass is cheap and it may be easier to just start over. It sucks you've dumped time and energy into it but you'll likely be much happier in the end if you start from scratch and incorporate what you've learned from this try. Either way, thanks for contributing and keep us updated.
I don't think it will be significantly smaller but I am starting to think it will not be big enough as well. Last night I ordered some more epoxy and stranded mat as the doubt crept in. I should be able to fill it with water tonight to see where I'm at. Good news it I have no doubt the second run will be a lot better.

No worries. I've lived my life through trial and error. Don't mind making a mokery of a project so long as I learn what I did wrong and improve on it. I actually pop-riveted quarter panels on as a teenager with no welder and no welding skill :eek: Then I learned why that was a terrible idea and learned how to weld.
 

UNBROKEN

4000 Post Club
Messages
4,248
Reactions
4,957
Points
352
Location
Houston, TX, USA
#10
Hell the building and learning is the fun part. I’ve screwed up more times than I care to remember…but I learned something every time.
 

OP
C

Cruising68

1000 Post Club
Messages
1,393
Reactions
1,033
Points
262
Location
Chicago, IL, USA
Thread Starter #11
Hell the building and learning is the fun part. I’ve screwed up more times than I care to remember…but I learned something every time.
Could not agree more. Frustrating when you take your first attempt or two and you don't really know what you're doing, but ultimately very satisfying once you figer out what you screwed up and get it right!

Went to fill it an hour ago. It's going to be close but I had a few holes that were leaking as I was pouring water in so I wasn't absolutely sure. Did a couple patches. It is only one layer of fleece and one layer of glass. I didn't want to waste more resin and fiberglass if it wasn't big enough.
 

OP
C

Cruising68

1000 Post Club
Messages
1,393
Reactions
1,033
Points
262
Location
Chicago, IL, USA
Thread Starter #12
Well....I just tried to fill with 6.4 gallons of water which according to my calculations is the exact amount I need for the TW5V2. It fit with some room to spare. Maybe a qt or two extra space. I was very surprised. Now I think I'm going to test fit in the location to see if the trim panel fits with ease. I'm planning on cutting a hole in the trim panel. If it fits within reason I might go with my first attempt. If it is off by any significant amount I will likely cut up the first one and use it for a mold for the better one. Hmmmmm.

Sub4.jpg
 

UNBROKEN

4000 Post Club
Messages
4,248
Reactions
4,957
Points
352
Location
Houston, TX, USA
#13
I hope that’s not MDF with water all over it? That’s not good.
next time measure with packing peanuts or something similar. MDF will swell and fall apart.
 

OP
C

Cruising68

1000 Post Club
Messages
1,393
Reactions
1,033
Points
262
Location
Chicago, IL, USA
Thread Starter #14
I hope that’s not MDF with water all over it? That’s not good.
next time measure with packing peanuts or something similar. MDF will swell and fall apart.
Agree. The only MDF is the ring and I basically filled it and dumped it out within 10 seconds and put it in front of the heater to keep it from soaking up water. I have Baltic Birch for the other parts of the build but no router to cut my own ring.

On a side note, I am seriously thinking about ditching the third row and building a storage/amp box in its place keeping the spare.
 

Last edited:
OP
C

Cruising68

1000 Post Club
Messages
1,393
Reactions
1,033
Points
262
Location
Chicago, IL, USA
Thread Starter #15
Well she fits....well pretty close. Sub box is installed and fits but I think it may be 1" too far out for the panel to look right. Think I'm going to start cutting out the trim panel to find out exactly how much I need. If it is an inch or less I will probably reinforce the ring and cut an inch off the outside.

I actually surprised myself. The first cut for the ring fits pretty darn good and it is perpendicular to the floor.

Sub5.jpg
 

TMac

1000 Post Club
Messages
1,696
Reactions
1,455
Points
262
Location
Knoxville, TN
#16
I'm not an audiophile, but I'm curious. Your posts have mentioned volume being something you've measured. Is there some connection between the diameter of the woofer and the volume you need behind them for best sound?
 

OP
C

Cruising68

1000 Post Club
Messages
1,393
Reactions
1,033
Points
262
Location
Chicago, IL, USA
Thread Starter #17
I'm not an audiophile, but I'm curious. Your posts have mentioned volume being something you've measured. Is there some connection between the diameter of the woofer and the volume you need behind them for best sound?
The shallow JL Audio sub I have specifies .6cuft of volume after the sub is installed. The volume is what the sub was designed for. Most subs of that size need a much larger enclosure which is why I chose what I chose. Too little volume and your low bass can suffer. A little bigger doesn't seem to be as bad as a little smaller. It worked out to 6.39 gallons before installing the sub so once I had the box sealed except for the speaker ring, I filled it up with the water and had about a qt or 2 qts of space left. I will test again and depending on how much extra space I have I may add some CLD and closed cell foam on the inside to add some weight, baffle, and take up some space.

And I am FAR from an audiophile, but I did stay at a Holiday Inn Express last night:eek:

Forgot to add, if you go too much bigger you can damage your sub as the amount of air controls the travel of the driver. To much volume and too little pressure and your driver can exceed specification.
 

Last edited:
OP
C

Cruising68

1000 Post Club
Messages
1,393
Reactions
1,033
Points
262
Location
Chicago, IL, USA
Thread Starter #18
Finished the outside of the box. Need to clean up the inside.

Sub6.jpg
 

Messages
51
Reactions
10
Points
7
Location
IL
#19
Looking good. Im weighing my options for a 12 in that spot or in the tire well like others have done. I want everything to be hidden as much as possible and secure.
 

OP
C

Cruising68

1000 Post Club
Messages
1,393
Reactions
1,033
Points
262
Location
Chicago, IL, USA
Thread Starter #20
So I did some more accurate measuring and found that I have 350Cubic Inches too much space. Could rebuild the box smaller but instead I'm building a fiberglass box to epoxy to the floor to get an accurate volume for the sub. Epoxy should cure overnight then I'm basically done with the enclosure minus putting in the driver and wiring. Leaving that until I'm ready to gut the oem system to keep the driver away from my accident prone hands. I'll post a pic of the completed enclosure tomorrow. Just glad I got something done with my back the way it is.


Top