Hello, Question to anyone who has owned these explorers for a while? I noticed when I bought the car that I had water in the spare tire compartment. It was a good amount of water close to three inches. I had vacuumed it out and took it to the dealer. They had to repair a hole in the compartment. I don't know how the hole got there. This was a used explorer with 10k miles. Anyway, come today about a week after getting the car back I noticed a little bit of water in the compartment again. It is obviously happening with heavy rains? Has anyone ever had this happen? If so, was it the rubber gasket or what?

-
Sign Up! To view all forums and unlock additional cool features
Welcome to the #1 Explorer ST Forum and Explorer ST community dedicated to Explorer ST owners and enthusiasts. Register for an account, it's free and it's easy, so don't hesitate to join the Explorer ST Forum today!
Water Getting in Rear Spare Compartment
- Thread starter willh876
- Start date
Hello, Question to anyone who has owned these explorers for a while? I noticed when I bought the car that I had water in the spare tire compartment. It was a good amount of water close to three inches. I had vacuumed it out and took it to the dealer. They had to repair a hole in the compartment. I don't know how the hole got there. This was a used explorer with 10k miles. Anyway, come today about a week after getting the car back I noticed a little bit of water in the compartment again. It is obviously happening with heavy rains? Has anyone ever had this happen? If so, was it the rubber gasket or what?
-
 1
1
- Show All
Hello, Question to anyone who has owned these explorers for a while? I noticed when I bought the car that I had water in the spare tire compartment. It was a good amount of water close to three inches. I had vacuumed it out and took it to the dealer. They had to repair a hole in the compartment. I don't know how the hole got there. This was a used explorer with 10k miles. Anyway, come today about a week after getting the car back I noticed a little bit of water in the compartment again. It is obviously happening with heavy rains? Has anyone ever had this happen? If so, was it the rubber gasket or what?
TECHNICAL SERVICE BULLETIN
Lack Of Audio And/Or Water Leak In Rear Of Vehicle And/Or Spare Tire Area23-2181
21 June 2023
This bulletin supersedes 22-2262. Reason for update: Concern Carryover to New Model
Model:
Ford
2020-2023 Explorer
Lincoln
2020-2023 Aviator
Summary
This article supersedes TSB 22-2262 to update the service procedure, and vehicle model years affected.
Issue: Some 2020-2023 Explorer/Aviator vehicles may exhibit a lack of audio and/or a water leak in the rear liftgate area and/or water in the spare tire area. The customer may indicate that this concern is more noticeable after a car wash or rainfall. To correct the condition, follow the Service Procedure to identify the leak path.
Action: Follow the Service Procedure steps to identify the leak path on vehicles that meet all of the following criteria:
Parts
Parts To Inspect And Replace Only If Necessary
Service Part NumberQuantityDescriptionUnit of IssuePiece QuantityLC5Z-14B350-BIf NeededAviator Power Liftgate Strut - Refer To The Parts Catalog For The VIN Specific Application11LB5Z-14B351-AIf NeededPower Liftgate Strut - Refer To The Parts Catalog For The VIN Specific Application1118K810If NeededAudio Control Module - Refer To The Parts Catalog For The VIN Specific Application11W710014-S300If NeededRubber Plug42
Quantity refers to the amount of the service part number required to repair the vehicle.
Unit of Issue refers to the number of individual pieces included in a service part number package.
Piece Quantity refers to the total number of individual pieces required to repair the vehicle.
As Needed indicates the amount of the part may vary and/or is not a whole number. Parts can be billed out as non-whole numbers, including less than 1.
If Needed indicates the part is not mandatory.
Warranty Status: Eligible under provisions of New Vehicle Limited Warranty (NVLW)/Service Part Warranty (SPW)/Special Service Part (SSP)/Extended Service Plan (ESP) coverage. Limits/policies/prior approvals are not altered by a TSB. NVLW/SPW/SSP/ESP coverage limits are determined by the identified causal part and verified using the OASIS part coverage tool.
Labor Times
DescriptionOperation No.Time2020-2023 Explorer/Aviator: Repair The Audio System And Any Water Leaks Following The Service Procedure (Do Not Use With Any Other Labor Operations)MT232181Actual Time
Repair/Claim Coding
Causal Part:5827840Condition Code:12
Service Procedure
1. Is this an Explorer or Aviator?
(1). Explorer - proceed to the Explorer Vehicle Inspection procedure.
(2). Aviator - proceed to the Aviator Vehicle Inspection procedure.
Explorer Vehicle Inspection
1. Open the rear liftgate.
2. Inspect and make sure the following components are correctly seated by pushing:
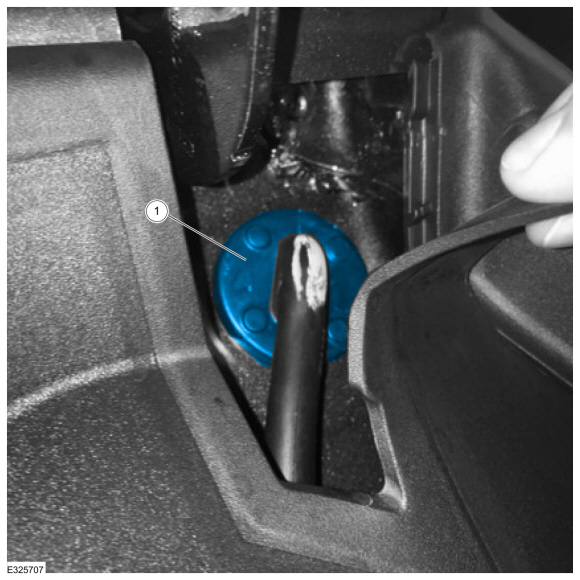
(1). Power liftgate grommet (if equipped). If not properly seated, replace the affected power liftgate strut. (Figure 1 Callout 1, Figure 2)
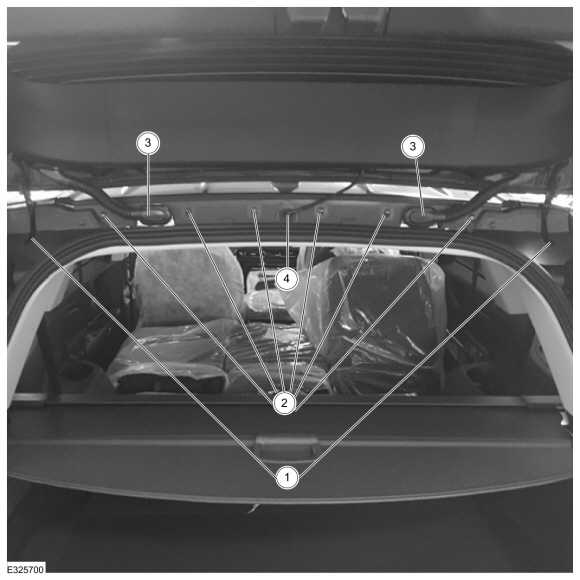
(2). Margin seal and margin seal pushpins. (Figure 1 Callout 2, Figure 3 Callout 2)
(3). Electrical wiring grommet. (Figure 1 Callout 3, Figure 3 Callout 3)
(4). Rear washer hose. (Figure 1 Callout 4, Figure 3 Callout 4)
Figure 1

ItemDescription 1
Power liftgate grommet (if equipped)
2
Margin seal and margin seal pushpins
3
Electrical wiring grommet
4
Rear washer hose
Figure 2


ItemDescription 1
Power liftgate grommet
2
Margin seal and margin seal pushpins
3
Electrical wiring grommet
4
Rear washer hose
3. If a water leak is present on the right side of the vehicle, replace the audio control module (ACM).
(1). Reinstall the rain shield (if equipped) on the new ACM. The rain shield, if present, is attached to the ACM chassis using a pushpin which can be reused.
4. Raise the vehicle on a hoist.
5. Inspect the right side rear corner area under the rear bumper cover for the following loose, disconnected, or missing items:
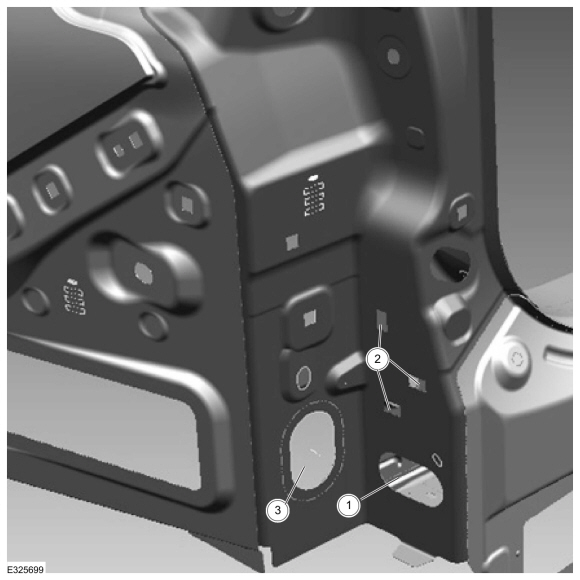
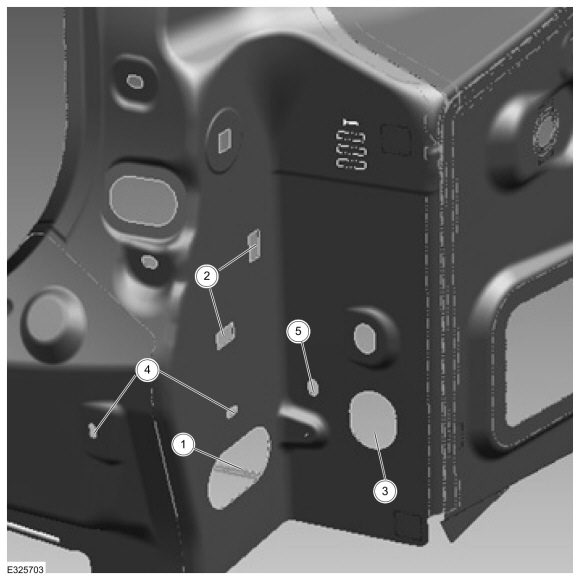
(1). Visually inspect for delete tape completely covering the body hole. (Figures 4-6 Callout 1) If the tape is damaged or leaking, replace with a rubber plug.
(2). Press down on the blind spot information system (BLIS) module to make sure it is fully seated into the body. (Figures 4-6 Callout 2)
(3). Visually inspect the BLIS module wire harness grommet is seated. (Figures 4-6 Callout 3)
Figure 4

Figure 5

Figure 6

6. Inspect the left side rear corner area under the rear bumper cover for the following loose, disconnected, or missing items:
(1). Visually inspect for delete tape completely covering the body hole. (Figures 7-9 Callout 1) If the tape is damaged or leaking, replace with a rubber plug.
(2). Press down on the BLIS module to make sure it is fully seated into the body. (Figures 7-9 Callout 2)
(3). Visually inspect the BLIS module wire harness grommet is seated. (Figures 7-9 Callout 3)
Figure 7
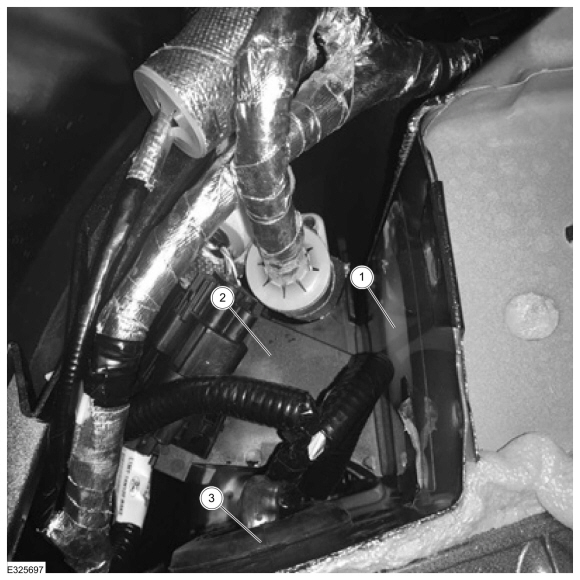
Figure 8
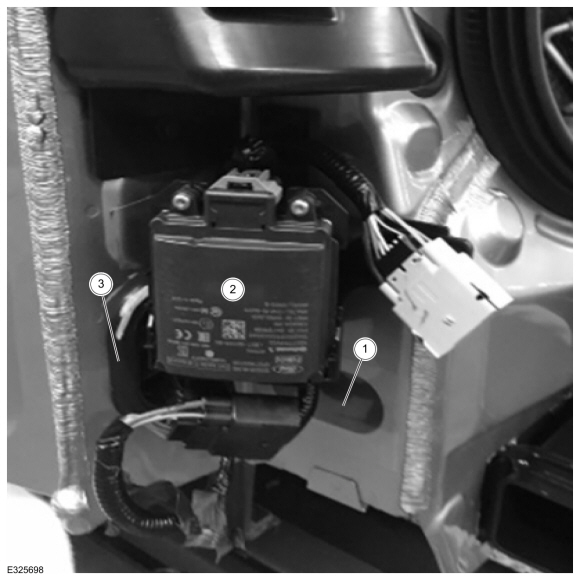
Figure 9
Aviator Vehicle Inspection
1. Open the rear liftgate.
2. Inspect and make sure the following components are correctly seated by pushing:
(1). Power liftgate grommet. If not properly seated, replace the affected power liftgate strut. (Figure 10 Callout 1, Figure 11)
(2). Margin seal and margin seal pushpins. (Figure 10 Callout 2)
(3). Electrical wiring grommet. (Figure 10 Callout 3)
(4). Rear washer hose. (Figure 10 Callout 4)
Figure 10
ItemDescription 1
Power liftgate grommet
2
Margin seal and margin seal pushpins
3
Electrical wiring grommet
4
Rear washer hose
Figure 11
3. If a water leak is present on the right side of the vehicle, replace the ACM.
(1). Reinstall the rain shield (if equipped) on the new ACM. The rain shield, if present, is attached to the ACM chassis using a pushpin which can be reused.
4. Raise the vehicle on a hoist.
5. Inspect the right side rear corner area under the rear bumper cover for the following loose, disconnected or missing items:
(1). Visually inspect for delete tape completely covering the body hole. (Figures 12-14 Callout 1) If the tape is damaged or leaking, replace with a rubber plug.
(2). Press down on the BLIS module to make sure it is fully seated into the body. (Figures 12-14 Callout 2)
(3). Visually inspect the BLIS module wire harness grommet is seated. (Figures 12-14 Callout 3)
(4). Make sure the wire harness grommet for the phone as a key feature is seated or the delete tape is completely covering the body hole. (Figures 12-14 Callout 4) If the tape is damaged or leaking, replace with a rubber plug.
(5). BLIS grommet to module wire. (Figures 12-14 Callout 5)
Figure 12
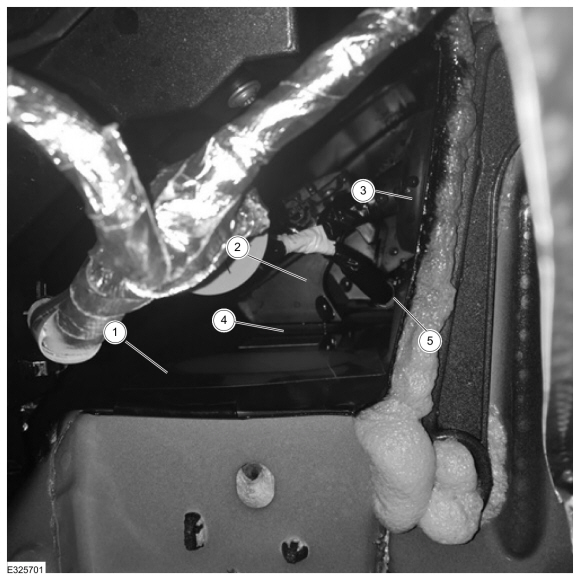
Figure 13

Figure 14
6. Inspect the left side rear corner area under the rear bumper cover for the following loose, disconnected or missing items:
(1). Visually inspect for delete tape completely covering the body hole. (Figures 15-17 Callout 1) If the tape is damaged or leaking, replace with a rubber plug.
(2). Press down on the BLIS module to make it is fully seated into the body. (Figures 15-17 Callout 2)
(3). Visually inspect the BLIS module wire harness grommet is seated. (Figures 15-17 Callout 3)
(4). Make sure the wire harness grommet for the phone as a key feature is seated or the delete tape is completely covering the body hole. (Figures 15-17 Callout 4) If the tape is damaged or leaking, replace with a rubber plug.
(5). Rear fascia wire. (Figures 15-17 Callout 5)
Figure 15

Figure 16
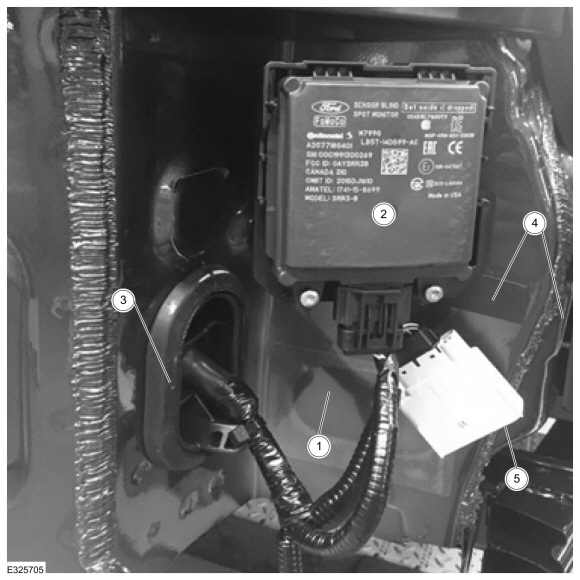
Figure 17

© 2023 Ford Motor Company
All rights reserved.
NOTE: The information in Technical Service Bulletins is intended for use by trained, professional technicians with the knowledge, tools, and equipment to do the job properly and safely. It informs these technicians of conditions that may occur on some vehicles, or provides information that could assist in proper vehicle service. The procedures should not be performed by "do-it-yourselfers". Do not assume that a condition described affects your car or truck. Contact a Ford or Lincoln dealership to determine whether the Bulletin applies to your vehicle. Warranty Policy and Extended Service Plan documentation determine Warranty and/or Extended Service Plan coverage unless stated otherwise in the TSB article. The information in this Technical Service Bulletin (TSB) was current at the time of printing. Ford Motor Company reserves the right to supersede this information with updates. The most recent information is available through Ford Motor Company's on-line technical resources.
Lack Of Audio And/Or Water Leak In Rear Of Vehicle And/Or Spare Tire Area23-2181
21 June 2023
This bulletin supersedes 22-2262. Reason for update: Concern Carryover to New Model
Model:
Ford
2020-2023 Explorer
Lincoln
2020-2023 Aviator
Summary
This article supersedes TSB 22-2262 to update the service procedure, and vehicle model years affected.
Issue: Some 2020-2023 Explorer/Aviator vehicles may exhibit a lack of audio and/or a water leak in the rear liftgate area and/or water in the spare tire area. The customer may indicate that this concern is more noticeable after a car wash or rainfall. To correct the condition, follow the Service Procedure to identify the leak path.
Action: Follow the Service Procedure steps to identify the leak path on vehicles that meet all of the following criteria:
• 2020-2023 Explorer/Aviator
• Lack of audio after a car wash or rainfall
• Water in the rear liftgate area and/or water in the spare tire area
• Lack of audio after a car wash or rainfall
• Water in the rear liftgate area and/or water in the spare tire area
Parts
Parts To Inspect And Replace Only If Necessary
Service Part NumberQuantityDescriptionUnit of IssuePiece QuantityLC5Z-14B350-BIf NeededAviator Power Liftgate Strut - Refer To The Parts Catalog For The VIN Specific Application11LB5Z-14B351-AIf NeededPower Liftgate Strut - Refer To The Parts Catalog For The VIN Specific Application1118K810If NeededAudio Control Module - Refer To The Parts Catalog For The VIN Specific Application11W710014-S300If NeededRubber Plug42
Quantity refers to the amount of the service part number required to repair the vehicle.
Unit of Issue refers to the number of individual pieces included in a service part number package.
Piece Quantity refers to the total number of individual pieces required to repair the vehicle.
As Needed indicates the amount of the part may vary and/or is not a whole number. Parts can be billed out as non-whole numbers, including less than 1.
If Needed indicates the part is not mandatory.
Warranty Status: Eligible under provisions of New Vehicle Limited Warranty (NVLW)/Service Part Warranty (SPW)/Special Service Part (SSP)/Extended Service Plan (ESP) coverage. Limits/policies/prior approvals are not altered by a TSB. NVLW/SPW/SSP/ESP coverage limits are determined by the identified causal part and verified using the OASIS part coverage tool.
Labor Times
DescriptionOperation No.Time2020-2023 Explorer/Aviator: Repair The Audio System And Any Water Leaks Following The Service Procedure (Do Not Use With Any Other Labor Operations)MT232181Actual Time
Repair/Claim Coding
Causal Part:5827840Condition Code:12
Service Procedure
1. Is this an Explorer or Aviator?
(1). Explorer - proceed to the Explorer Vehicle Inspection procedure.
(2). Aviator - proceed to the Aviator Vehicle Inspection procedure.
Explorer Vehicle Inspection
1. Open the rear liftgate.
2. Inspect and make sure the following components are correctly seated by pushing:
(1). Power liftgate grommet (if equipped). If not properly seated, replace the affected power liftgate strut. (Figure 1 Callout 1, Figure 2)
(2). Margin seal and margin seal pushpins. (Figure 1 Callout 2, Figure 3 Callout 2)
(3). Electrical wiring grommet. (Figure 1 Callout 3, Figure 3 Callout 3)
(4). Rear washer hose. (Figure 1 Callout 4, Figure 3 Callout 4)
Figure 1
ItemDescription 1
Power liftgate grommet (if equipped)
2
Margin seal and margin seal pushpins
3
Electrical wiring grommet
4
Rear washer hose
Figure 2
ItemDescription 1
Power liftgate grommet
2
Margin seal and margin seal pushpins
3
Electrical wiring grommet
4
Rear washer hose
3. If a water leak is present on the right side of the vehicle, replace the audio control module (ACM).
(1). Reinstall the rain shield (if equipped) on the new ACM. The rain shield, if present, is attached to the ACM chassis using a pushpin which can be reused.
4. Raise the vehicle on a hoist.
5. Inspect the right side rear corner area under the rear bumper cover for the following loose, disconnected, or missing items:
(1). Visually inspect for delete tape completely covering the body hole. (Figures 4-6 Callout 1) If the tape is damaged or leaking, replace with a rubber plug.
(2). Press down on the blind spot information system (BLIS) module to make sure it is fully seated into the body. (Figures 4-6 Callout 2)
(3). Visually inspect the BLIS module wire harness grommet is seated. (Figures 4-6 Callout 3)
Figure 4
Figure 5
Figure 6
6. Inspect the left side rear corner area under the rear bumper cover for the following loose, disconnected, or missing items:
(1). Visually inspect for delete tape completely covering the body hole. (Figures 7-9 Callout 1) If the tape is damaged or leaking, replace with a rubber plug.
(2). Press down on the BLIS module to make sure it is fully seated into the body. (Figures 7-9 Callout 2)
(3). Visually inspect the BLIS module wire harness grommet is seated. (Figures 7-9 Callout 3)
Figure 7
Figure 8
Figure 9
Aviator Vehicle Inspection
1. Open the rear liftgate.
2. Inspect and make sure the following components are correctly seated by pushing:
(1). Power liftgate grommet. If not properly seated, replace the affected power liftgate strut. (Figure 10 Callout 1, Figure 11)
(2). Margin seal and margin seal pushpins. (Figure 10 Callout 2)
(3). Electrical wiring grommet. (Figure 10 Callout 3)
(4). Rear washer hose. (Figure 10 Callout 4)
Figure 10
ItemDescription 1
Power liftgate grommet
2
Margin seal and margin seal pushpins
3
Electrical wiring grommet
4
Rear washer hose
Figure 11
3. If a water leak is present on the right side of the vehicle, replace the ACM.
(1). Reinstall the rain shield (if equipped) on the new ACM. The rain shield, if present, is attached to the ACM chassis using a pushpin which can be reused.
4. Raise the vehicle on a hoist.
5. Inspect the right side rear corner area under the rear bumper cover for the following loose, disconnected or missing items:
(1). Visually inspect for delete tape completely covering the body hole. (Figures 12-14 Callout 1) If the tape is damaged or leaking, replace with a rubber plug.
(2). Press down on the BLIS module to make sure it is fully seated into the body. (Figures 12-14 Callout 2)
(3). Visually inspect the BLIS module wire harness grommet is seated. (Figures 12-14 Callout 3)
(4). Make sure the wire harness grommet for the phone as a key feature is seated or the delete tape is completely covering the body hole. (Figures 12-14 Callout 4) If the tape is damaged or leaking, replace with a rubber plug.
(5). BLIS grommet to module wire. (Figures 12-14 Callout 5)
Figure 12
Figure 13
Figure 14
6. Inspect the left side rear corner area under the rear bumper cover for the following loose, disconnected or missing items:
(1). Visually inspect for delete tape completely covering the body hole. (Figures 15-17 Callout 1) If the tape is damaged or leaking, replace with a rubber plug.
(2). Press down on the BLIS module to make it is fully seated into the body. (Figures 15-17 Callout 2)
(3). Visually inspect the BLIS module wire harness grommet is seated. (Figures 15-17 Callout 3)
(4). Make sure the wire harness grommet for the phone as a key feature is seated or the delete tape is completely covering the body hole. (Figures 15-17 Callout 4) If the tape is damaged or leaking, replace with a rubber plug.
(5). Rear fascia wire. (Figures 15-17 Callout 5)
Figure 15
Figure 16
Figure 17
© 2023 Ford Motor Company
All rights reserved.
NOTE: The information in Technical Service Bulletins is intended for use by trained, professional technicians with the knowledge, tools, and equipment to do the job properly and safely. It informs these technicians of conditions that may occur on some vehicles, or provides information that could assist in proper vehicle service. The procedures should not be performed by "do-it-yourselfers". Do not assume that a condition described affects your car or truck. Contact a Ford or Lincoln dealership to determine whether the Bulletin applies to your vehicle. Warranty Policy and Extended Service Plan documentation determine Warranty and/or Extended Service Plan coverage unless stated otherwise in the TSB article. The information in this Technical Service Bulletin (TSB) was current at the time of printing. Ford Motor Company reserves the right to supersede this information with updates. The most recent information is available through Ford Motor Company's on-line technical resources.
-
2
- Show All
Thread Starter
#10
So a little update on the issue of water getting into the rear tire well. The tech said it was leaking from the BLIS system which the above documents show an excellent diagram of. It's located I guess under the bumper of the rear. If this has happened to anyone else in the same spot as mine did this seem to fix the problem?
I'm late to the party but when I had this problem on my fairly new 2020 ST, the dealer found a body plug that wasn't properly snapped in. If I parked the car even slightly downhill there was no water instrusion, but parkeeven slightly uphill there was significant water intrusion into the spare tire area. They installed a new body plug and haven't had a problem since.
Crazy, because I bought this car to replace my 2010 CTS-V wagon that let water in past the deformed taillights and water got into the spare tire well on that car.
Now the same 2020ST suddenly has a drip from behind the glove box. Another adventure begins.
Crazy, because I bought this car to replace my 2010 CTS-V wagon that let water in past the deformed taillights and water got into the spare tire well on that car.
Now the same 2020ST suddenly has a drip from behind the glove box. Another adventure begins.