A quick install guide for the Fenfab Instake. I had A LOT of help from Brett, Tyler, Chris, Billy, and Er Ick on the FB page in doing this install. Note that I have the JLT catch can, the UPR requires a little diff process.
Watch Billy's Youtube video first to get a good idea of the process. Link:
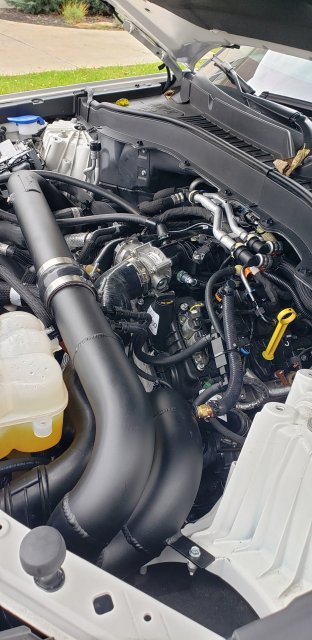
It's a good idea to unpack everything and do a quick fit up of the intake assembly. You will have 3x intake pipes (pass side, driver turbo inlet, and collector/filter assy), 2x black vacuum fittings, 1x npt to 1/2" barb fitting, a 3/8" hose, a 1/2" hose, a junction box (JB), and zip ties.
Tools Required:
Basic sockets and extension, deep sockets a plus. I think you use 7mm, 8mm, 10mm, and 1/4".
Hose clamp pliers or vice grips
Sufficient lighting!
Box knife
Steps do not need to be followed in this order, just how I did the install.
Step 1 - Remove strut tower brace
Step 2 - Remove OEM air box assembly. Unclip 2x clamps on pass side, unscrew clamps on each side, remove lid, twist the air sensor and pull out, remove 10mm bolt on back side of box, pull up on lower portion of box to remove (give it a good tug).
Step 3 - Remove OEM intake tubes. Disconnect the aux vacuum hoses from the driver side intake, there are 4. Pass side is a screw clamp (not at the turbo inlet), driver side is a hose clamp that is right at the turbo inlet. I bought a set of hose clamp pliers off Amazon, made quick work of it. Also you will need to remove the recirc hose from the BOV at the BOV port. Keep the other side connected to the OEM intake pipe.
Step 4 - Remove factory air snorkel. FIRST REMOVE THE AIR SENSOR ON THE INTERCOOLER!!!!! This requires a 27 torx bit. You can pull the snorkel out without having to remove the bumper. If you don't remove the air sensor then you will more than likely break it as I did. Fortunately for me the dealer down the street had one in stock.
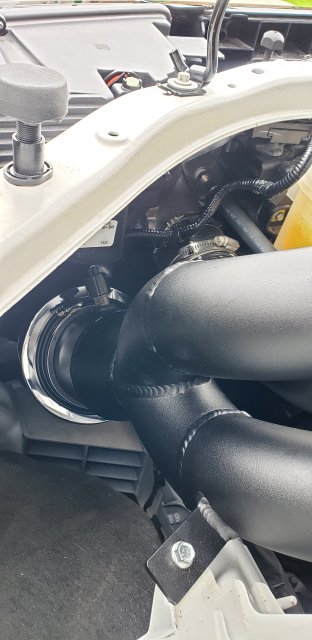
Step 5. - Fit in the Fenfab intake pipes. I started with the driver side turbo inlet first. Tighten the silicone adapter to the FF pipe first, then slide on to the turbo inlet, slightly tighten the inlet but not all the way.
Step 6 - Install the air filter / merge collector piping. Don't tighten all the clamps just yet. Once the pipe is in go ahead and put the frame bolt in that attaches the intake to the wheel arch. Make sure you install the air sensor in the grommet, just twist it in until it's flush.
Step 7 - Install passenger side intake pipe. Once it's in wiggle everything around and once it's all fit up go ahead and tighten the clamps.
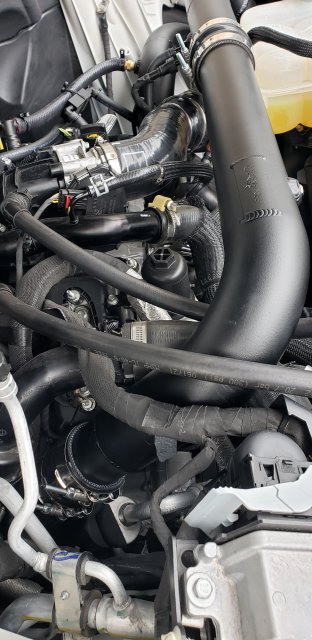
Now on to the aux vacuum hoses. This part confused me at first, so with the help of Billy, Chris, Tyler, Er Ick, and Brett I was able to get everything lined up. The Fenfab intake comes with a black 3-way junction box, or JB.
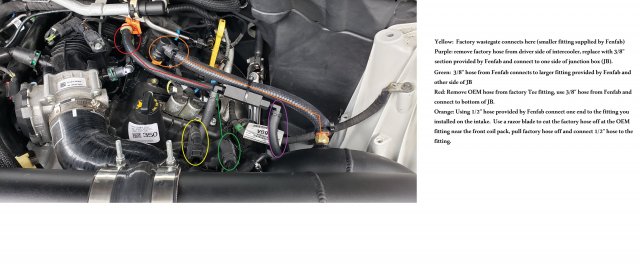
Step 8 - install the 2x black vacuum fittings that came with the FF kit, I put the small one on the pass side, large one on driver side. Make sure you don't lose the o-ring on the smaller one. Connect the driver side wastegate connector to the small fitting. Ref yellow circle in pic.
Step 9 - Remove the OEM hose from the upper driver side intercooler. Slide on the 3/8" hose from the FF kit on the fitting, secure with a zip tie. I used a bigger zip tie for this rather than one from the FF kit.
Step 10 - Remove the OEM fitting on top of the tee on the top side of the intake manifold (ref red circle in pic). Connect the other end of the 3/8" hose here.
Step 11 - You know the orange "tamper proof" OEM connector that causes all the fits for the UPR catch can? yeah, we get to mess with that again. I used a razor to gently cut the OEM hose off the connector, leaving the connector in the manifold. Attach the 1/2" hose from the FF kit to the orange connector, secure with zip tie. Install the 1/2" NPT to barb fitting in the FF intake pipe and connect the other side of the 1/2" hose to the fitting, securing with zip tie. Ref orange circle and line in pic.
Step 12 - Locate the JB on this 1/2 hose and secure with zip ties. Remember the 3/8" hose we installed in steps 9 and 10? We are going to cut that hose and connect the bottom fitting on the JB to the tee fitting on the intake maifold (ref red circle and line in pic).
Step 13 - connect the driver side fitting of JB to the intercooler connection (ref purple circle in pic)
Step 14 - connect passenger side fitting of JB to large black vacuum fitting in the intake (ref green line and circle in pic)
Double check all of your connections, start up your ST and as long as there are no vacuum leaks you will have normal idle and no CEL. Again, HUGE thank you to the guys on the HP Exp ST page - Billy, Chris, Tyler, Er Ick, and Brett. Everything fit great. Took about 45min to remove the OEM intake and install the FF intake piping. A few FB messages with these guys and had the aux vacuum lines sorted out in no time.
Watch Billy's Youtube video first to get a good idea of the process. Link:
It's a good idea to unpack everything and do a quick fit up of the intake assembly. You will have 3x intake pipes (pass side, driver turbo inlet, and collector/filter assy), 2x black vacuum fittings, 1x npt to 1/2" barb fitting, a 3/8" hose, a 1/2" hose, a junction box (JB), and zip ties.
Tools Required:
Basic sockets and extension, deep sockets a plus. I think you use 7mm, 8mm, 10mm, and 1/4".
Hose clamp pliers or vice grips
Sufficient lighting!
Box knife
Steps do not need to be followed in this order, just how I did the install.
Step 1 - Remove strut tower brace
Step 2 - Remove OEM air box assembly. Unclip 2x clamps on pass side, unscrew clamps on each side, remove lid, twist the air sensor and pull out, remove 10mm bolt on back side of box, pull up on lower portion of box to remove (give it a good tug).
Step 3 - Remove OEM intake tubes. Disconnect the aux vacuum hoses from the driver side intake, there are 4. Pass side is a screw clamp (not at the turbo inlet), driver side is a hose clamp that is right at the turbo inlet. I bought a set of hose clamp pliers off Amazon, made quick work of it. Also you will need to remove the recirc hose from the BOV at the BOV port. Keep the other side connected to the OEM intake pipe.
Step 4 - Remove factory air snorkel. FIRST REMOVE THE AIR SENSOR ON THE INTERCOOLER!!!!! This requires a 27 torx bit. You can pull the snorkel out without having to remove the bumper. If you don't remove the air sensor then you will more than likely break it as I did. Fortunately for me the dealer down the street had one in stock.
Step 5. - Fit in the Fenfab intake pipes. I started with the driver side turbo inlet first. Tighten the silicone adapter to the FF pipe first, then slide on to the turbo inlet, slightly tighten the inlet but not all the way.
Step 6 - Install the air filter / merge collector piping. Don't tighten all the clamps just yet. Once the pipe is in go ahead and put the frame bolt in that attaches the intake to the wheel arch. Make sure you install the air sensor in the grommet, just twist it in until it's flush.
Step 7 - Install passenger side intake pipe. Once it's in wiggle everything around and once it's all fit up go ahead and tighten the clamps.
Now on to the aux vacuum hoses. This part confused me at first, so with the help of Billy, Chris, Tyler, Er Ick, and Brett I was able to get everything lined up. The Fenfab intake comes with a black 3-way junction box, or JB.
Step 8 - install the 2x black vacuum fittings that came with the FF kit, I put the small one on the pass side, large one on driver side. Make sure you don't lose the o-ring on the smaller one. Connect the driver side wastegate connector to the small fitting. Ref yellow circle in pic.
Step 9 - Remove the OEM hose from the upper driver side intercooler. Slide on the 3/8" hose from the FF kit on the fitting, secure with a zip tie. I used a bigger zip tie for this rather than one from the FF kit.
Step 10 - Remove the OEM fitting on top of the tee on the top side of the intake manifold (ref red circle in pic). Connect the other end of the 3/8" hose here.
Step 11 - You know the orange "tamper proof" OEM connector that causes all the fits for the UPR catch can? yeah, we get to mess with that again. I used a razor to gently cut the OEM hose off the connector, leaving the connector in the manifold. Attach the 1/2" hose from the FF kit to the orange connector, secure with zip tie. Install the 1/2" NPT to barb fitting in the FF intake pipe and connect the other side of the 1/2" hose to the fitting, securing with zip tie. Ref orange circle and line in pic.
Step 12 - Locate the JB on this 1/2 hose and secure with zip ties. Remember the 3/8" hose we installed in steps 9 and 10? We are going to cut that hose and connect the bottom fitting on the JB to the tee fitting on the intake maifold (ref red circle and line in pic).
Step 13 - connect the driver side fitting of JB to the intercooler connection (ref purple circle in pic)
Step 14 - connect passenger side fitting of JB to large black vacuum fitting in the intake (ref green line and circle in pic)
Double check all of your connections, start up your ST and as long as there are no vacuum leaks you will have normal idle and no CEL. Again, HUGE thank you to the guys on the HP Exp ST page - Billy, Chris, Tyler, Er Ick, and Brett. Everything fit great. Took about 45min to remove the OEM intake and install the FF intake piping. A few FB messages with these guys and had the aux vacuum lines sorted out in no time.
Last edited:
-
 3
3
- Show All