• Sign Up! To view all forums and unlock additional cool features

    Welcome to the #1 Explorer ST Forum and Explorer ST community dedicated to Explorer ST owners and enthusiasts. Register for an account, it's free and it's easy, so don't hesitate to join the Explorer ST Forum today!


FenFab Charge Pipe w/ TS BOV Install Instructions

Messages
252
Reactions
112
Points
37
Location
New Orleans
#1
Does anyone know where I can locate install instructions for the FenFab Charge Pipe and TurboSmart BOV Install for a 2021+ ST?


Sent from my iPhone using Tapatalk Pro
 

OP
S
Messages
252
Reactions
112
Points
37
Location
New Orleans
Thread Starter #2
Looking to install today but black and white version that I received from FenFab is very hard to see. Any assistance would be greatly appreciated


Sent from my iPhone using Tapatalk Pro
 

V3nom3nom

Member
Nurse
Messages
183
Reactions
100
Points
27
Location
Houston, TX, USA
Vehicle
2020 Explorer ST
#3
Charge pipe install
Turbosmart BOV install
 

OP
S
Messages
252
Reactions
112
Points
37
Location
New Orleans
Thread Starter #4
I don’t have the stock BOV so I’m curious of the difference in installation


Sent from my iPhone using Tapatalk Pro
 

Messages
42
Reactions
9
Points
2
Location
Denver Colorado
Vehicle
2023 Ford Explorer ST
#5
I don’t have the stock BOV so I’m curious of the difference in installation


Sent from my iPhone using Tapatalk Pro
did you ever figure out instructions or how did you install it?
 

OP
S
Messages
252
Reactions
112
Points
37
Location
New Orleans
Thread Starter #6
did you ever figure out instructions or how did you install it?
Sadly no, still sitting in a box in my closet. Honestly haven’t had time.


Sent from my iPhone using Tapatalk Pro
 

Messages
209
Reactions
88
Points
27
Location
Waupun, WI, USA
#7
Pretty easy. Since you don't have a factory BoV, it's install and run the vacuum line to the provided "tee" that you put in the line from the throttle body to the EVAP solenoid. With the non-BoV equipped vehicles, there's no monkeying around with the resistor, or plugging the factory BoV flange(I would imagine, not 100% positive).
 

Messages
37
Reactions
29
Points
12
Location
Chicagoland
Vehicle
2022 Explorer ST
#8
I installed this same pipe with a tial BOV and could never get it to work right even with different springs. I’m not an expert on this platform but from what I’ve read elsewhere here, the non BOV models crack the throttle open a little bit so it ends up delaying the BOV opening and when it does it’s barely noticeable.
 

Messages
66
Reactions
40
Points
17
Location
Jacksonville, FL, USA
#9
I installed this same pipe with a tial BOV and could never get it to work right even with different springs. I’m not an expert on this platform but from what I’ve read elsewhere here, the non BOV models crack the throttle open a little bit so it ends up delaying the BOV opening and when it does it’s barely noticeable.
Did you ever get it to work properly?
 

Messages
37
Reactions
29
Points
12
Location
Chicagoland
Vehicle
2022 Explorer ST
#10
Nope, took The parts off and they’re just sitting in my garage. May revisit this once the warranty is up so I can hopefully correct it in the tune.
 

brojam81

New Member
U.S. Marine Veteran
Messages
14
Reactions
2
Points
2
Location
Akron, OH
Vehicle
2022 Ford Explorer ST
#11
Nope, took The parts off and they’re just sitting in my garage. May revisit this once the warranty is up so I can hopefully correct it in the tune.
I installed my FenFab Charge pipe w/HKS BOV today on my 2022 ST.

Like you guys, there is only the video from "Knight's Garage" (referenced above in post #3) to go from a visual point. I don't work on cars or have a heavy knowledge of every hose and connector. The B&W directions you get from FenFab are pretty pathetic, but I guess they assume you know what you're doing.

While the video is excellent in helping you figure out how to change the factory charge pipe to the new FenFab one, it doesn't include the steps for a BOV.

The BOV should have a new rubber O-ring and a spring clip to hold the BOV on the charge pipe. This is the hardest part of the installation, to be honest. After 30 minutes of trying, I started Googling and couldn't find anything worthwhile. Some guys said it took them 5 hours, lol.

Here is my solution.

Buy these pliers from Home Depot; Channellock 8 in. Retaining Snap Ring Pliers

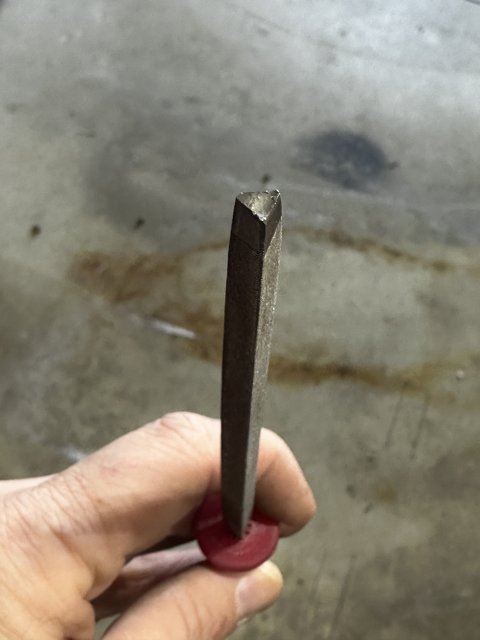
Then, insert the included silver, 90-degree ends into the ends of the pliers. Using a triangle edge file (pictured below), create 2 divets on the inner sides of both 90-degree ends like this.

IMG_3882.JPG IMG_3879.JPG

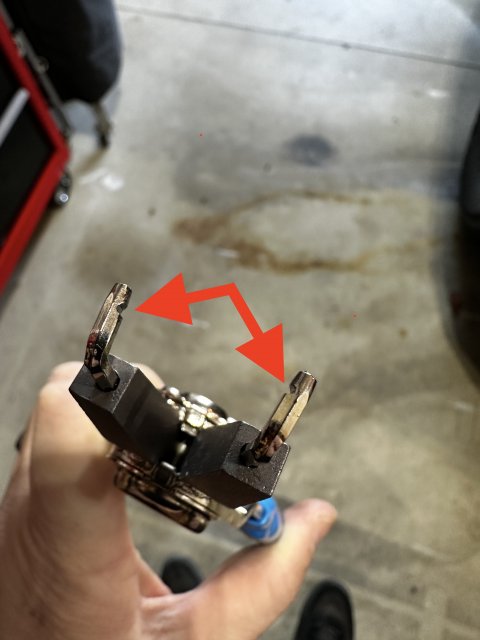
Doing so gave me a much stronger grip on the spring clip. The rubber O-ring was still pretty thick and didn't leave enough room for the spring clip to fit over the BOV in the flange.

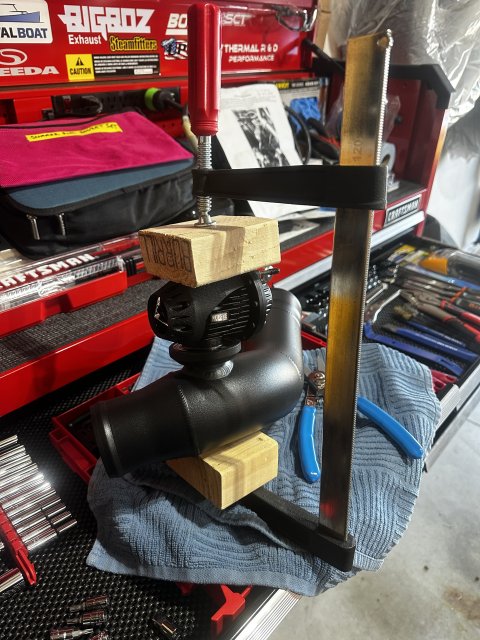
Using an F-clamp and 2 pieces of 2x4 wood, I could compress the BOV safely enough to get the spring clip to fit with no problem and didn't bend or mark up anything.

IMG_3878.JPG

Hopefully, this helps someone, as this forum has greatly helped me.


Top