• Sign Up! To view all forums and unlock additional cool features

    Welcome to the #1 Explorer ST Forum and Explorer ST community dedicated to Explorer ST owners and enthusiasts. Register for an account, it's free and it's easy, so don't hesitate to join the Explorer ST Forum today!


What Have You Done To Your Explorer ST Today

UNBROKEN

4000 Post Club
Messages
4,217
Reactions
4,910
Points
352
Location
Houston, TX, USA
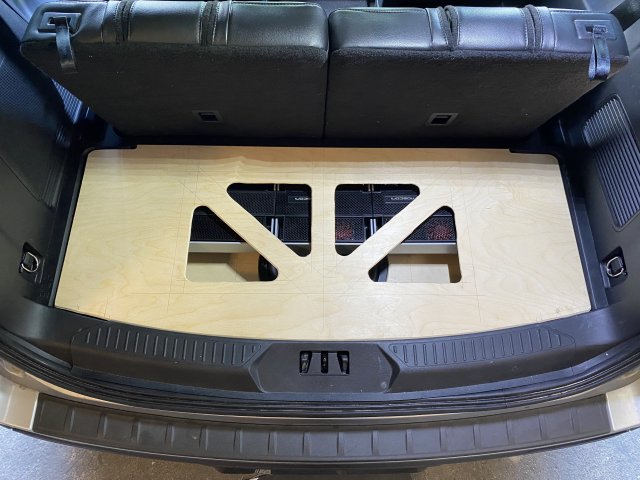
Got my lower trim panel fabricated and triple checked my mock up for the amps. This one will hide any wiring and also leave me a little space on the side to store my tire repair kit. It’s held in place with 6 neo magnets.
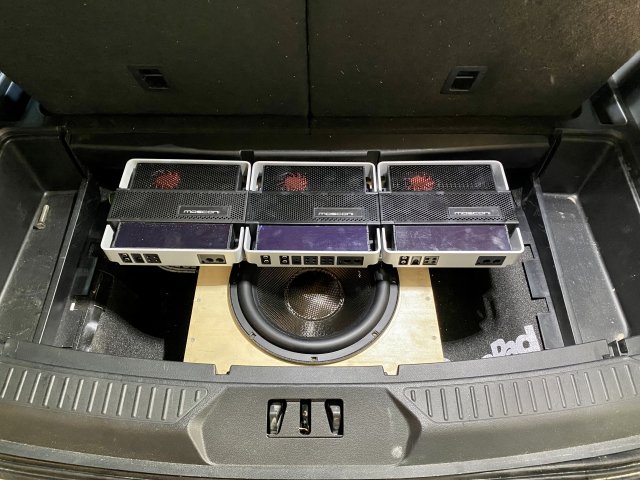
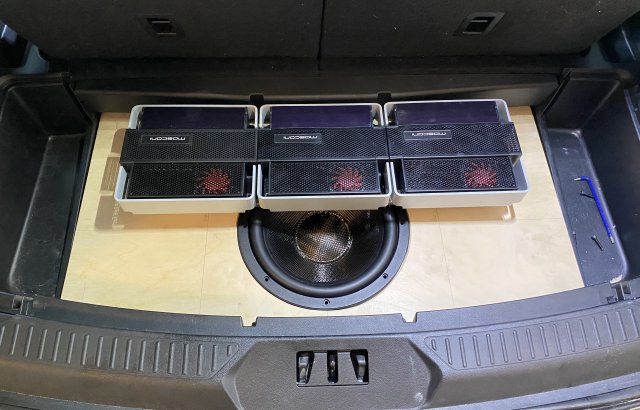
Amps will be mounted backwards…I’ll order new badges to flip those the right way but I want them backwards to hide all the wiring. All the controls are on top so once the wire connections are made I don’t need access again. I also got the top trim panel cut and fit…still waiting for the steel mesh to show up so I can see how deep to router the panel to flush fit it before I wrap it. You’ll never see that design if you open the hatch…but I wanted everything to be able to breathe. Next weekend…wiring…yay. lol
185E0D10-87A0-479E-A67C-2BFE496EC6FF.jpeg 0498979E-1F40-4E4A-98C6-4CB70E003A80.jpeg D7C69846-33F8-4C90-9AFD-FC37987C47C2.jpeg
 

Last edited:

TMac

1000 Post Club
Messages
1,695
Reactions
1,453
Points
262
Location
Knoxville, TN
I have hearing loss in both ears, so the unit in the ST is fine for me, anything else would be wasted. But I'm seriously impressed. I take it the NAV TV unit (weird name that) basically takes the existing B&O system outputs and (in home theater parlance) creates pre-outs for the amps?
 

UNBROKEN

4000 Post Club
Messages
4,217
Reactions
4,910
Points
352
Location
Houston, TX, USA
I have hearing loss in both ears, so the unit in the ST is fine for me, anything else would be wasted. But I'm seriously impressed. I take it the NAV TV unit (weird name that) basically takes the existing B&O system outputs and (in home theater parlance) creates pre-outs for the amps?
Right…it plugs into the factory wiring and gets rid of the amps and all that. From the NAV unit I’ll do optical into the DSP…it’s a cleaner signal and saved me a couple hundred for 4 more RCA’s.
 

TMac

1000 Post Club
Messages
1,695
Reactions
1,453
Points
262
Location
Knoxville, TN
Right…it plugs into the factory wiring and gets rid of the amps and all that. From the NAV unit I’ll do optical into the DSP…it’s a cleaner signal and saved me a couple hundred for 4 more RCA’s.
So, how many discrete outputs does the NAV handle? What about the DSP and the amps? From your description, it looks like the amps support 7 channels?
 

UNBROKEN

4000 Post Club
Messages
4,217
Reactions
4,910
Points
352
Location
Houston, TX, USA
So, how many discrete outputs does the NAV handle? What about the DSP and the amps? From your description, it looks like the amps support 7 channels?
Depends on how you wire the NAV. It has RCA outputs as well…off the top of my head I don’t remember how many. An optical signal into a DSP can run whatever you want. I only need 8 channels so I bought the DSP that I need for this install. If I ever want to expand the system I could swap DSP’s for one with more outputs and go nuts.
 

zdubyadubya

Active Member
Messages
813
Reactions
632
Points
232
Location
Utah
Vehicle
2020 ST
Well.... THIS was a 5-hour long PITA... looks nice tho.

IMG_2011.jpg
 

zdubyadubya

Active Member
Messages
813
Reactions
632
Points
232
Location
Utah
Vehicle
2020 ST
Is that the FenFab unit? Has it thrown any codes?
Yup. A Gen 1. I preferred the look/style to his Gen 2 revision. Nope, no codes, he included the fix with the intake. The fix is a simple t-connection to three different air lines no biggie. I actually got this installed on Friday and have put a few hundred miles on it over the weekend. All is good so far. Sounds really nice too--alot more intake noise.
 

Messages
280
Reactions
165
Points
37
Location
Sacramento, CA, USA
Vehicle
2021 Explorer ST Carbonized Gray
Do you mind me asking where you got the H&Rs from? I've heard they're still not available. I ordered mine on June 1st.
Sure, I got them here: https://www.tirerack.com/suspension...utoModel=Explorer+ST+4WD&autoModClar=Standard
I had to wait about 6 weeks but they finally came. Installed them on Sunday too!
 

Messages
86
Reactions
28
Points
17
Location
Des Moines, IA, USA
Attached a Pro-Fit mount to the dash. Screws in behind the vents. Will place my Rokform mount onto it, we’ll see.
I would be interested to seeing the final result. I like this mount that I just ordered one. Now need to figure out what to attach to it.
 

Messages
155
Reactions
173
Points
37
Location
Lake Wylie, SC, USA
Good deal, glad to see that it looks like they might start coming back into stock. I ordered mine from Whoosh Motorsports. I like to support small business so, hopefully since the big box places are beginning to get them, maybe the smaller places aren't far behind. Enjoy and, can't wait for mine to show up!
 

Staggie

Member
U.S. Army Veteran
Messages
60
Reactions
41
Points
17
Location
Frederick, MD, USA
I would be interested to seeing the final result. I like this mount that I just ordered one. Now need to figure out what to attach to it.
I added a Rokform Qi charger as I have a Rokform case. What I didn’t like was how the Rokform mount attached to another Rokform mount, which made it stick out too far. So I dremeled off the back and double sided taped it to the Pro-Fit mount. I’ll have to take a photo once my wife gets home. But this is when I installed it.
 

Attachments

Messages
86
Reactions
28
Points
17
Location
Des Moines, IA, USA
I added a Rokform Qi charger as I have a Rokform case. What I didn’t like was how the Rokform mount attached to another Rokform mount, which made it stick out too far. So I dremeled off the back and double sided taped it to the Pro-Fit mount. I’ll have to take a photo once my wife gets home. But this is when I installed it.
Gotcha. I bought the mount, and then the proclip mount so I can have car play available whenever I dock in. I’ll post pictures once’s done. Just happy I don’t have to drill into anything.
 

Staggie

Member
U.S. Army Veteran
Messages
60
Reactions
41
Points
17
Location
Frederick, MD, USA
Gotcha. I bought the mount, and then the proclip mount so I can have car play available whenever I dock in. I’ll post pictures once’s done. Just happy I don’t have to drill into anything.
You have to screw the mount into the dash, as this one doesn’t use any existing screws. However, if you remove, at least there will be no visible holes. I moved mine slightly further to the left instead of using where they had it.
 

Cdubya

1000 Post Club
Messages
1,469
Reactions
717
Points
262
Location
NE Ohio
Vehicle
2020 Explorer ST
Gotcha. I bought the mount, and then the proclip mount so I can have car play available whenever I dock in. I’ll post pictures once’s done. Just happy I don’t have to drill into anything.
The proclip holster mount is pretty nice. I bought a Carlinkit wireless carplay recently so went with an auto-clamping Qi wireless charger mount. Most of the car mounts use a 17mm ball joint so like Staggie, I drilled out the AMPS ball joint on the Pro-Fit. Then attached a 17mm ball joint for the charger mount. Have a USB-C cord go down behind the screen, inside the center stack and back into the car charger cubby.
9A74B26D-6341-47AF-B67E-146059601F0E.jpeg DFED088A-0B66-4160-A37B-28183A7B020E.jpeg
 

Last edited:
Messages
86
Reactions
28
Points
17
Location
Des Moines, IA, USA
The proclip holster mount is pretty nice. I bought a Carlinkit wireless carplay recently so went with a Qi wireless charger mount. Most of the car mounts use a 17mm ball joint so like Staggie, I drilled out the AMPS ball joint on the Pro-Fit and attached a 17mm ball joint.
View attachment 7471
I am curious on what the end result looks like. I may need to go that route perhaps as well.
 

Messages
28
Reactions
16
Points
2
Location
Buffalo, NY, USA
Installed the S/T hitch cover today! That along with the floor liners, window tint, and lug nut covers from a few weeks ago has reduced my 0-60 time by 0.0004 seconds!
 

Attachments

Messages
86
Reactions
28
Points
17
Location
Des Moines, IA, USA
The proclip holster mount is pretty nice. I bought a Carlinkit wireless carplay recently so went with an auto-clamping Qi wireless charger mount. Most of the car mounts use a 17mm ball joint so like Staggie, I drilled out the AMPS ball joint on the Pro-Fit. Then attached a 17mm ball joint for the charger mount. Have a USB-C cord go down behind the screen, inside the center stack and back into the car charger cubby.
View attachment 7471 View attachment 7473
Awesome! Thanks for the pictures, I was wondering the best way to route the usb cable. Thanks for sharing that information.
 

Staggie

Member
U.S. Army Veteran
Messages
60
Reactions
41
Points
17
Location
Frederick, MD, USA
Awesome! Thanks for the pictures, I was wondering the best way to route the usb cable. Thanks for sharing that information.
When you’re installing the mount, you have to take out the head unit screen bolts. If you remove the screen, you have access to run a usb cable into the center console cubby. You’ll have to drill a small hole in the top and a small one in the cover at the top. In the event you want to get rid of the cable, you’re only buying a cheap cover to replace the one you drilled.


Top