• Sign Up! To view all forums and unlock additional cool features

    Welcome to the #1 Explorer ST Forum and Explorer ST community dedicated to Explorer ST owners and enthusiasts. Register for an account, it's free and it's easy, so don't hesitate to join the Explorer ST Forum today!


DIY 170° thermostat, by OE supplier Stant. A $20 project.

Messages
336
Reactions
268
Points
67
Location
The midwest
#1
My main involvement with the car scene has been with the '03-'04 Cobra "Terminator" crowd that has gone back many years, including my own web site dedicated to the vehicle and its history: www.terminator-cobra.com. One of my side projects, that is on hold now due to the insanity of 2020, has been custom Stant 170° thermostats (Stant is the OE supplier, by the way). You can buy them on-line for something like $70, but since I decided to take a break - and may not ever get back to it - I decided to share the "secret" of them for anyone that has just basic mechanical skills and wants to save some coin.

For about $20, this is a total DIY project for the ST that takes about 5 minutes and is laughably simple. Since the factory RT1225 thermostat is a 180° version, many might want a lower-temp 170° after getting tuned and modified. All you need to do is buy a Stant 14138 (180°) and 14147 (170°), make a quick part swap, then add a gasket to its flange and you are done. The gasket is also easy to acquire as a Stant 25282 (the same as NAPA 1093 or FelPro 35710), which is needed here so the flange is the correct diameter for the housing.

Here is the 14138 (both MUST be from Stant, easily identified by the blue & yellow box!):

Stant 14138.jpg

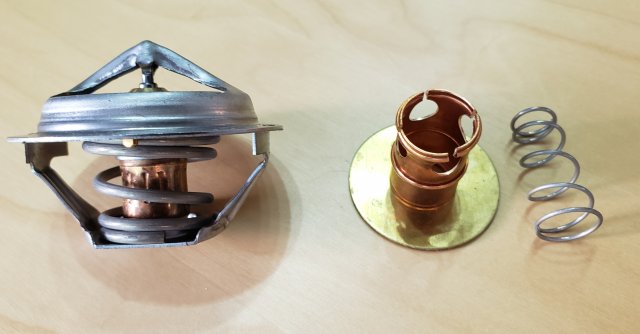
With this in hand, you just need to pull out the brass 'foot' and its internal spring. The spring sits inside with a larger coil on the bottom, and then will be transferred to the other thermostat. You can then toss the main thermostat body. Here's what you have once the 'foot' is removed:

20200807_190534.jpg

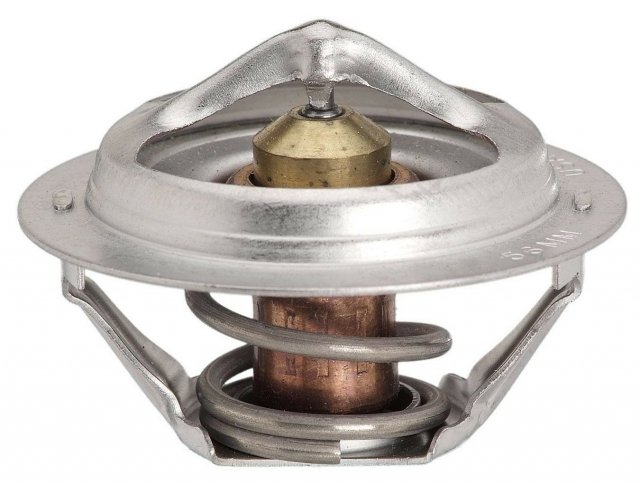
The Stant 14147 looks like this, which is the 170° base that has a 56mm OD flange compared to the 54mm flange of the 180°:

Stant 14147.jpg

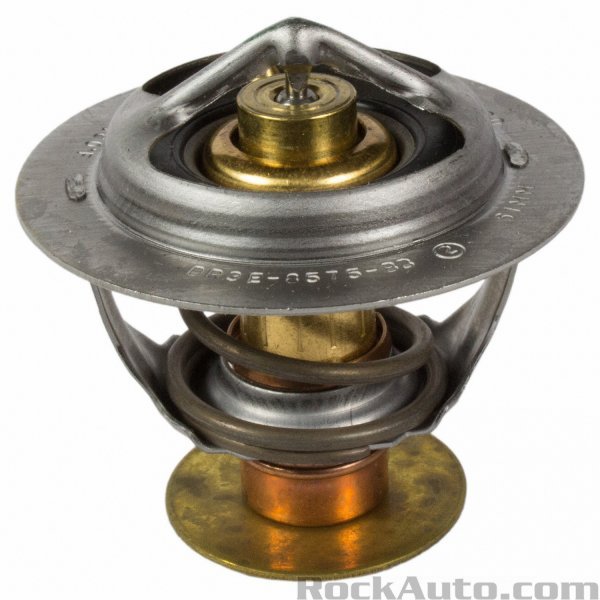
You simply then snap the brass foot and spring back in the bottom of the 14147, then add the gasket to the flange which brings the diameter up to 61mm for a proper fit in the housing (this thermostat also fits the Ford Coyote 5.0 V-8):

P1040960.JPG

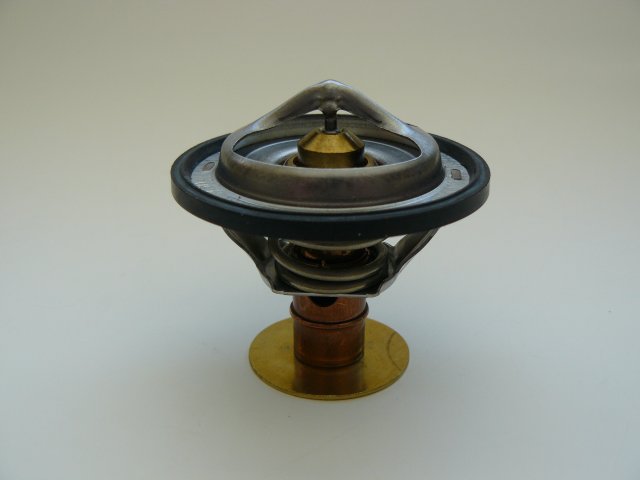
In the above image, which is then the final product, note the orientation of the gasket since it has a flat side that faces down. The internal groove will fit right over the flange of the 56mm 14147 housing and you are good to go. As an FYI, here is the OE Motorcraft (also made by Stant) RT1225 180° thermostat. It looks a bit different, but the dimensions are the same as above:

BR3Z8575D-FRO__ra_p.jpg
 

Last edited:
OP
jrgoffin
Messages
336
Reactions
268
Points
67
Location
The midwest
Thread Starter #3
Messages
287
Reactions
293
Points
67
Location
Las Vegas, NV, USA
#4
When two items do the exact same thing, and you can purchase one for a third of the price, makes complete sense. Used to sell another version to the Mustang crowd since there was a significant price disparity and they moved quite well.
I seriously couldn't care less
We retail parts here and there is always a DIY way of doing things if you want to bad enough. I just find it very humorous that you posted right after I did with the thermostat.
I guess I'll look for your DIY on the next item I post for the Explorer lol
 

dolsen

Member
U.S. Marine Veteran
Messages
271
Reactions
158
Points
37
Location
Louisville, KY, USA
#5
Wow, OP, I can’t believe the resistance you’re getting on this... on two different threads. Thanks for helping people out. Not everyone is mad at you for this


Sent from my iPhone using Tapatalk
 

OP
jrgoffin
Messages
336
Reactions
268
Points
67
Location
The midwest
Thread Starter #6
I seriously couldn't care less
We retail parts here and there is always a DIY way of doing things if you want to bad enough. I just find it very humorous that you posted right after I did with the thermostat.
I guess I'll look for your DIY on the next item I post for the Explorer lol
The timing was completely coincidental actually. I put together a four-page document for the Cobra guys and then had forgotten about this since it was just a matter of posting a few pictures. I couldn't care less about any of your other items - and actually hope you sell them well - but sometimes there are those that don't mind saving a few $$$ on something so simple.

Wow, OP, I can’t believe the resistance you’re getting on this... on two different threads. Thanks for helping people out. Not everyone is mad at you for this


Sent from my iPhone using Tapatalk
This is nothing. When I discovered how to actually rebuild the other version (for the Cobra's) and began selling them, there were dozens of posts from guys in Mustang Facebook groups losing their minds over it. One particular vendor out there sells the exact same product with a big middle-man mark-up, and you would have thought that making it known how it was simply a modified factory part that anyone could cobble together was a felony of some sorts. Oh well, that is why I sold hundreds of them and showed how easy it was to make it this DIY project. Every little bit counts.
 

Messages
244
Reactions
111
Points
37
Location
Tucson, AZ
#7
Great post
 

Messages
79
Reactions
31
Points
17
Location
New York, NY, USA
#8
Bought the parts off ebay for 20$...but the 'foot' is not so easy to remove... any tips on that? Do you just straight up pull it out?
 

OP
jrgoffin
Messages
336
Reactions
268
Points
67
Location
The midwest
Thread Starter #9
A twist and pull motion works - will come out easily. Wear gloves, too - the sharp edges will get you.
 

UNBROKEN

4000 Post Club
Messages
4,243
Reactions
4,954
Points
352
Location
Houston, TX, USA
#10
FYI the Explorer doesn’t use a perimeter gasket so I hope you’re right on the OD working.
 

OP
jrgoffin
Messages
336
Reactions
268
Points
67
Location
The midwest
Thread Starter #11
FYI the Explorer doesn’t use a perimeter gasket so I hope you’re right on the OD working.
I'm well aware. It's not based on whether there is a gasket or not, it's about the OD. The OE replacement has a diameter of 61mm, which is why the flange gasket is there: to allow a correct fit within the housing. I have been selling these for years, and as I've already mentioned, it's the same thermostat used in the Coyote engine.

Here's the page on my other site that lists this same model: http://www.termi-stat.com/coyote.htm
 

UNBROKEN

4000 Post Club
Messages
4,243
Reactions
4,954
Points
352
Location
Houston, TX, USA
#12
You’re the one that mentioned the gasket bringing the OD up to the proper measurement. I’m just letting everyone know it doesn’t use a perimeter gasket in the 3.0.
 

OP
jrgoffin
Messages
336
Reactions
268
Points
67
Location
The midwest
Thread Starter #13
You’re the one that mentioned the gasket bringing the OD up to the proper measurement. I’m just letting everyone know it doesn’t use a perimeter gasket in the 3.0.
Once again, it is on there since it must be used to bring the OD up to the correct size in order to fit. It's the whole reason I state that it is part of the package, and a necessary modification for proper fit. Apparently I wasn't clear enough? The OE RT1225 obviously doesn't use the gasket, rather an o-ring.
 

UNBROKEN

4000 Post Club
Messages
4,243
Reactions
4,954
Points
352
Location
Houston, TX, USA
#14
I didn’t try it since I didn’t have one on hand but the way the t-stat housing is designed on these 3.0’s I question whether it will bolt together properly with a perimeter gasket in place. The design is different than anything I’ve ran across to date.
 

OP
jrgoffin
Messages
336
Reactions
268
Points
67
Location
The midwest
Thread Starter #15
Well, this ‘improvised’ design has been used in the Coyote engine for years. Same idea: replacing the RT1225 (and o-ring) with this and the new gasket instead. You don’t use the o-ring on top of the gasket! No reason it shouldn’t work here. The alternative is to buy the machined down Stant thermostat online for around $70 (or whatever it sells for now). For the guys that like to tinker and save some cash, this is merely another option.
 

UNBROKEN

4000 Post Club
Messages
4,243
Reactions
4,954
Points
352
Location
Houston, TX, USA
#16
Maybe I’m not being clear here myself. I’ve changed them in Coyotes and now this 3.0...the t-stat housing is entirely different between the 2. This one has a female bevel on the housing and a male bevel on the cap that captures the o-ring. I’m not positive it will seal correctly either without the o-ring or with the gasket. Picture how an AN fitting mates to seal...it’s similar to that.
I’m not saying your way doesn’t work. I’m saying to whoever tries your way to verify a good seal before proceeding...because it’s not like a Coyote.
 

OP
jrgoffin
Messages
336
Reactions
268
Points
67
Location
The midwest
Thread Starter #17
Sure the housings are probably different, but the same idea with the thermostat, o-ring, and male/female section. Here’s the Ford image showing the ST’s fitment: the groove in the outer half sandwiches the o-ring just like the Coyote, which would compress the gasket in the same manner. The trick is to use the factory spec on the bolts which I seem to recall is ONLY 18 in/lbs.

BF4DD8E9-59C5-48A1-9E4C-69DF1D73F2B7.jpeg
 

Kryuenger

Member
U.S. Navy Veteran
Messages
86
Reactions
21
Points
7
Location
Thousand Oaks, CA, USA
#18
What are the benefits of running a 170 degree thermostat?


Top