• Sign Up! To view all forums and unlock additional cool features

    Welcome to the #1 Explorer ST Forum and Explorer ST community dedicated to Explorer ST owners and enthusiasts. Register for an account, it's free and it's easy, so don't hesitate to join the Explorer ST Forum today!


Added a Rockford Fosgate Amp and JL Audio 10" Sub

Messages
57
Reactions
36
Points
17
Location
Florida
Vehicle
2020 Explorer ST
#1
Okie dokes. Long story short, I wasn't thrilled with the bump from the OEM sub. It was okay, but I wanted more. I considered swapping out the OEM one, but then I'd have to figure out the OEM amp, is that enough for the new sub, blah blah blah. Anyway, I decided to just tack on a new amp and sub, leave the OEM one in place and functional, and call it a day.

The amp I used is a Rockford Fosgate T500X1br mono amp, it puts out 500W RMS @ 1 Ohm / 300W RMS @ 2 Ohm.
The sub is a JL Audio 10" shallow sub (300W RMS @ 2 Ohm).

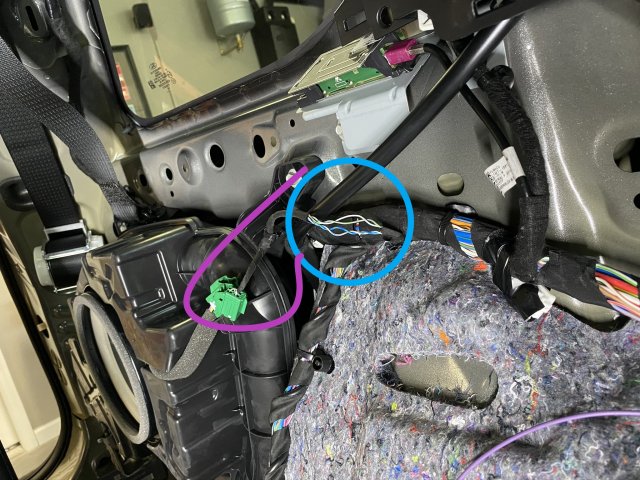
One of the bigger questions (with time consuming research to match) was figuring out how to get the audio signal into the amp. After spending a lot of time with the FSM, I decided to tap into the existing signal for the OEM sub. It's possible I could have maybe used one of the other speakers, but I wasn't clear on whether the signal going to these was already pre-processed to eliminate the sub frequencies or not. The safest bet, I figured, was to use the signal going to the OEM sub. I know it contains the audio signal I want. Sooooo. A couple pictures down will show exactly where I tapped in, which wires I tapped into, what color they are and what they are for.

Please do keep in mind that this is for a 2020 Explorer ST (with the B&O fancy sound system). If you have something different, or your wire colors aren't matching mine, stop and do some research - something might have changed between years.

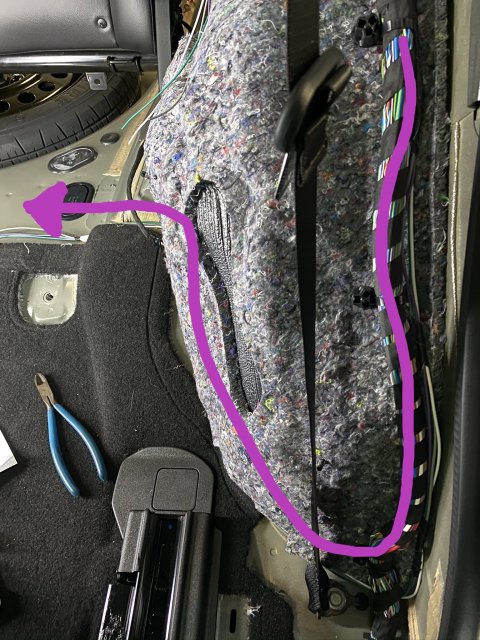
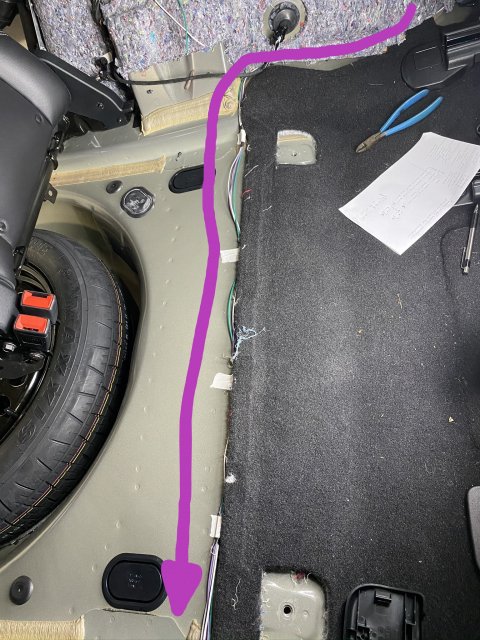
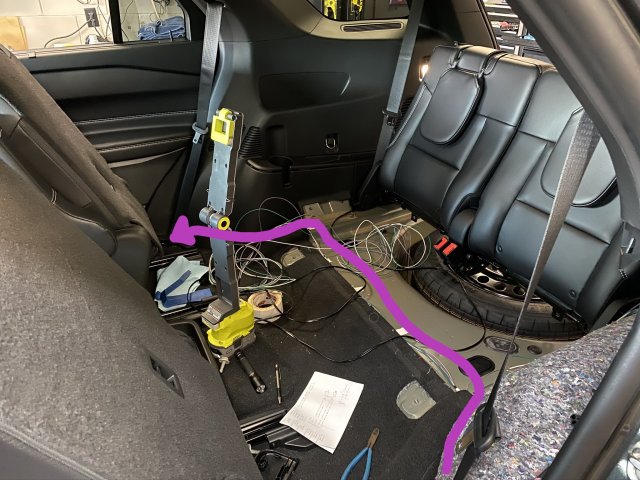
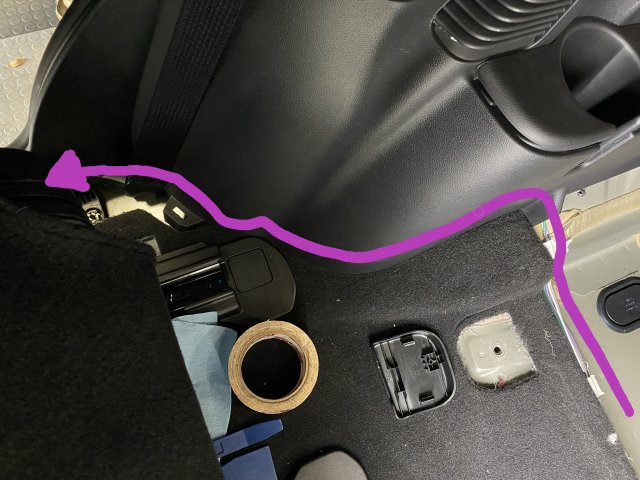
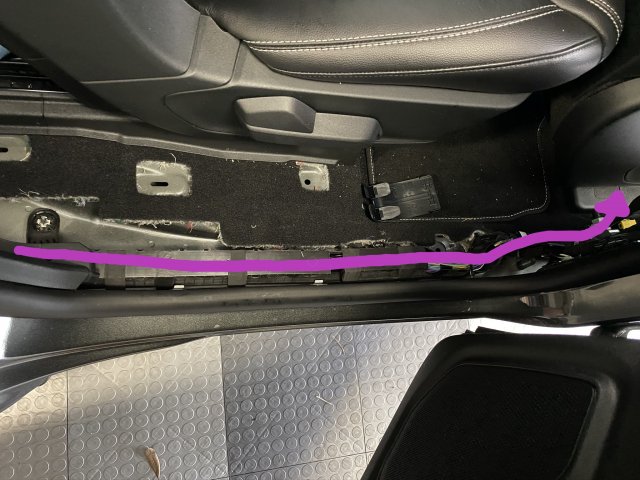
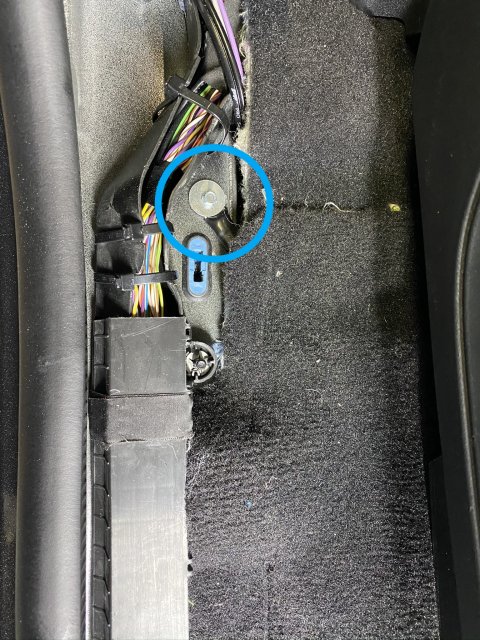
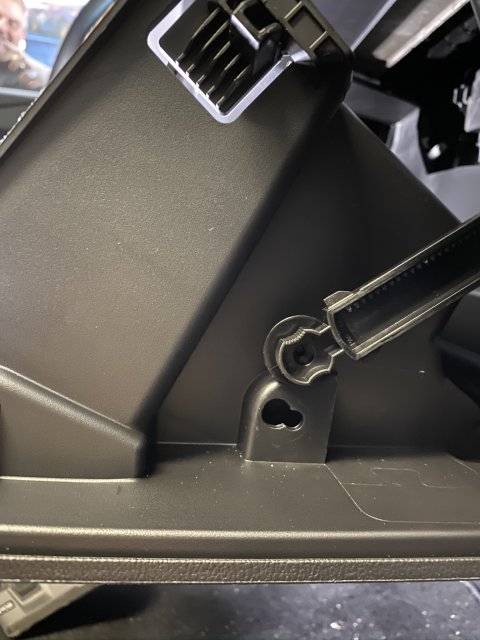
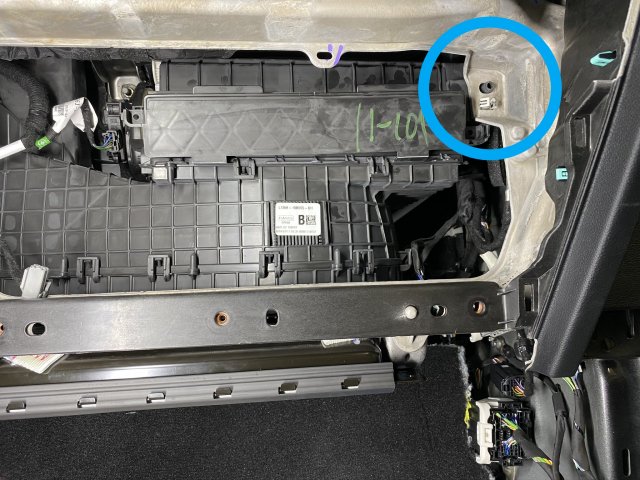
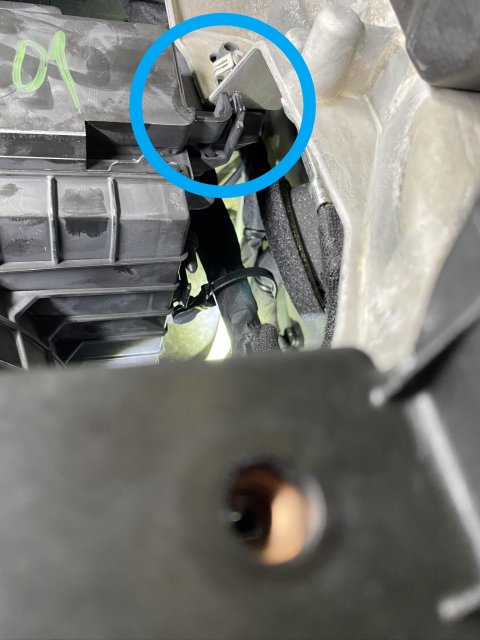
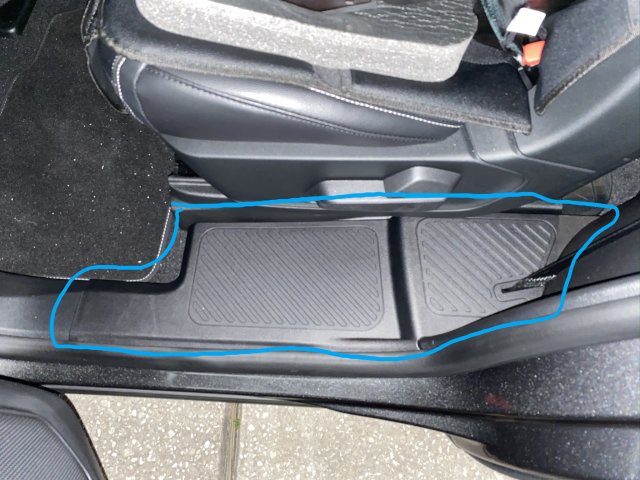
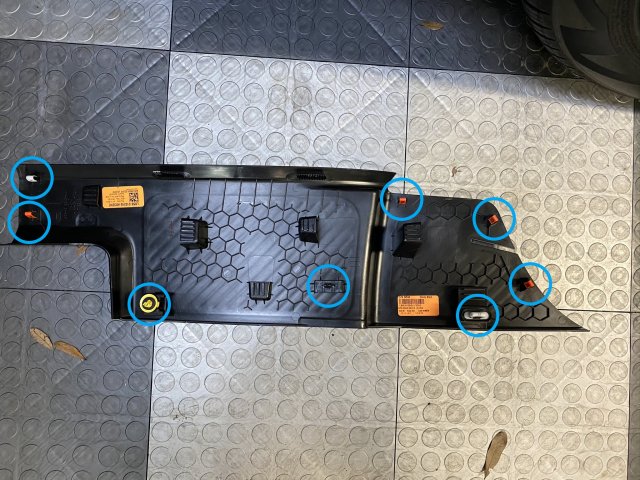
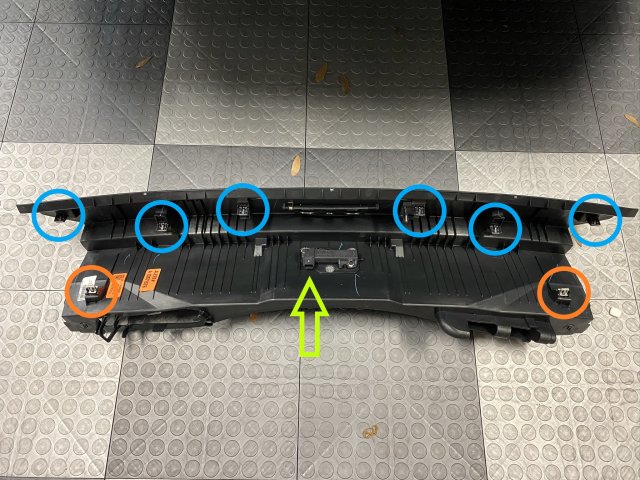
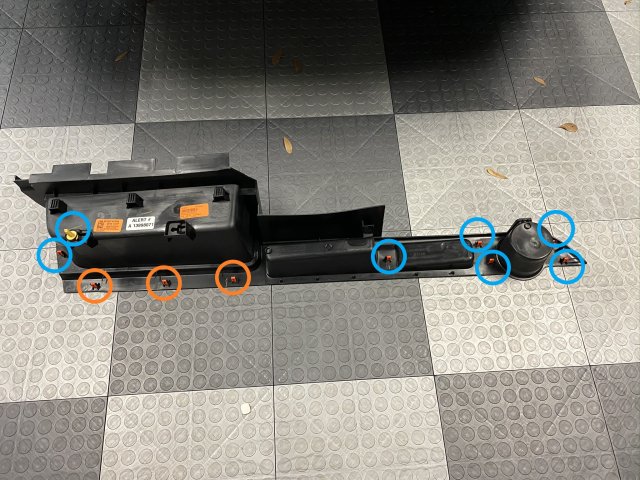
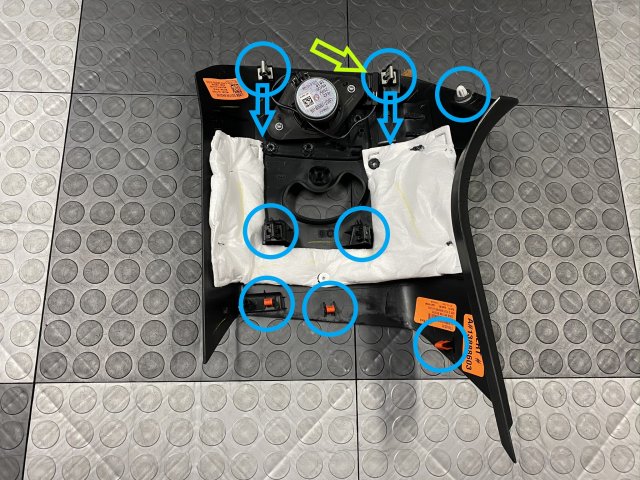
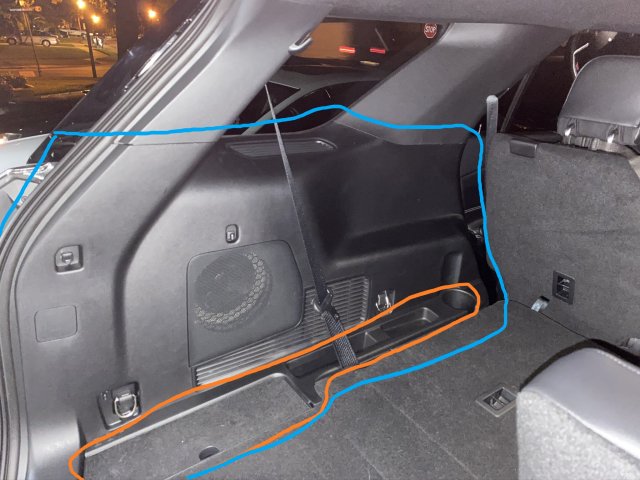
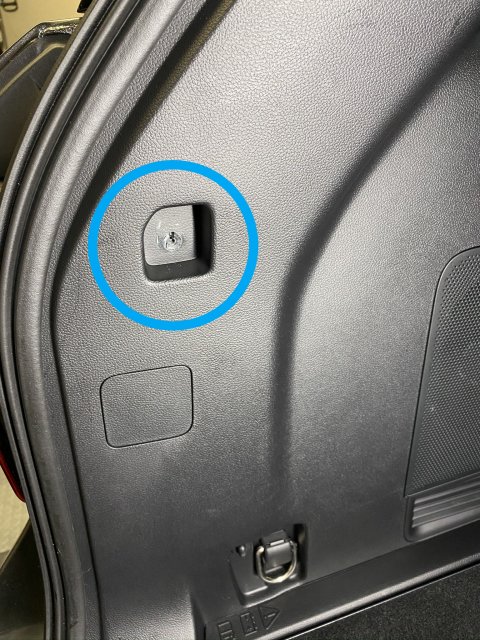
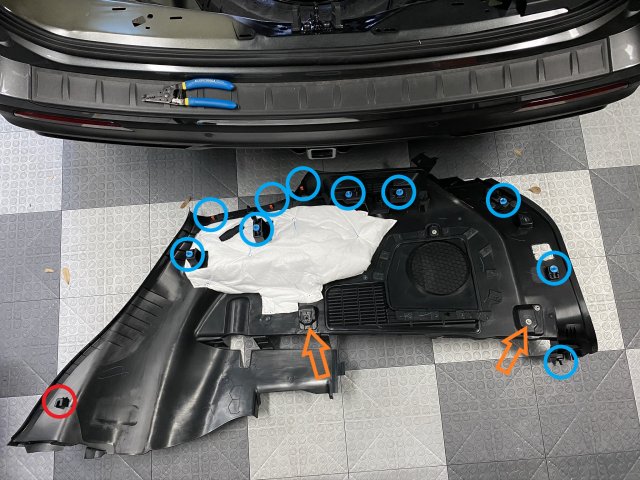
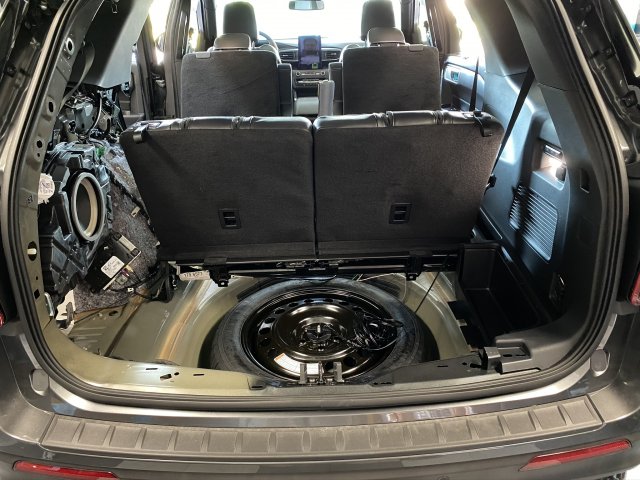
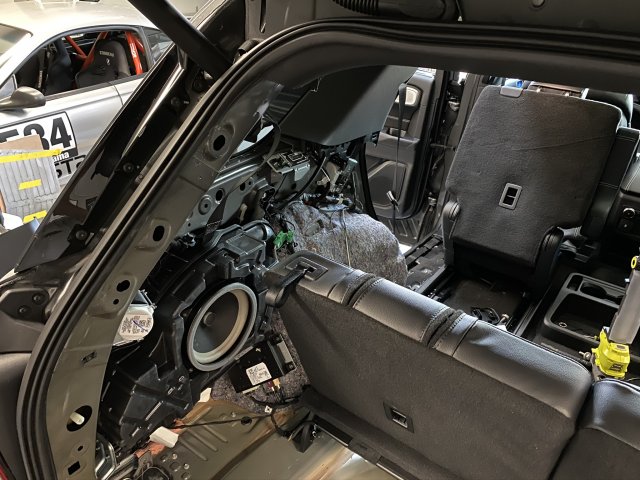
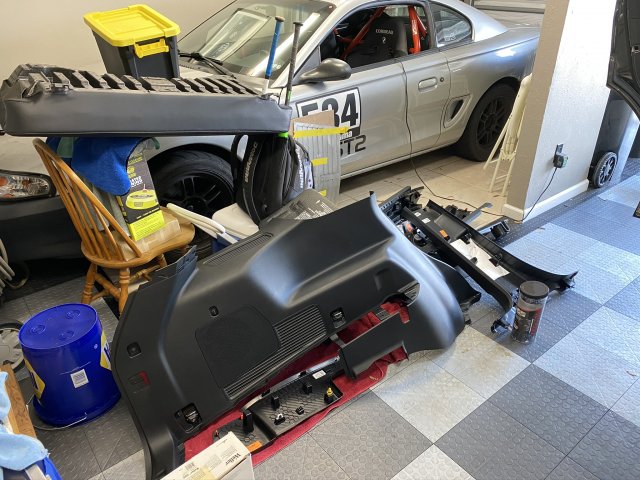
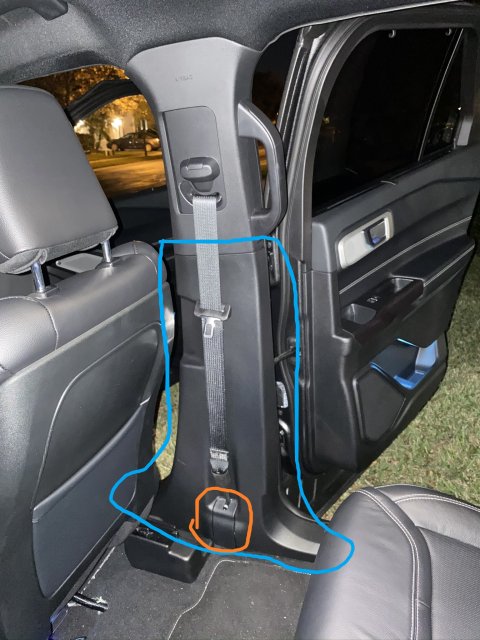
Anyway, here we go. Most of the pictures are of the trim panels I had to remove to get to various things. I also took pictures of the backside of the trim panels so you can see exactly where the fasteners are. This was a bit nerve wracking for me, considering the car was brand new and I hadn't taken these off before. But between the FSM and going slow/being careful, I was able to get everything off without breaking anything.

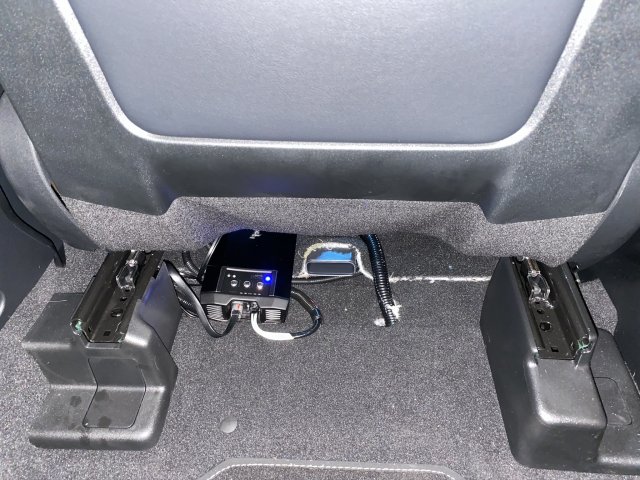
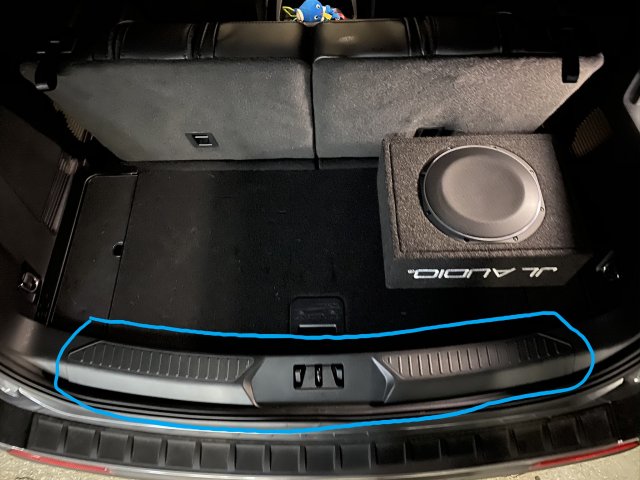
But right before we jump in, here's the sub and amp, when the install was finished:
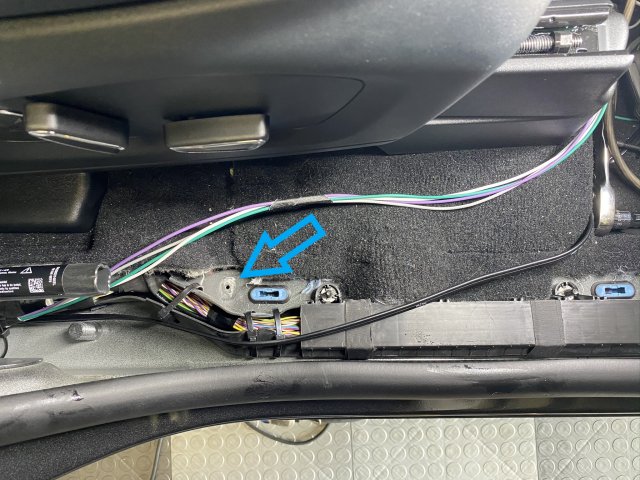
02.JPEG

01.JPEG


Getting the Signal

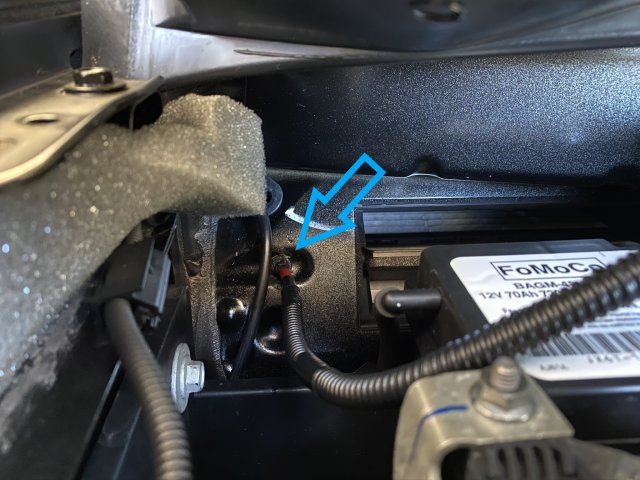
I tapped the existing sub for the line-level inputs into the amp. (Again, keep in mind this is for a 2020, and I'm not responsible for whatever work-slash-damage you do to your Explorer). There are two sets of wires that feed the OEM sub (it's a DVC [dual voice coil] sub), these are the colors of those wires:
  • "SUBWOOFER 1" (I used as Left channel)
    • positive (+) = Green/Violet wire
    • negative (-) = Gray wire
  • "SUBWOOFER 2" (I used as Right channel)
    • positive (+) = White/Blue wire
    • negative (-) = Blue/Green wire
This is the location, in the BLUE circle:

40.JPEG
 

Last edited:
OP
M
Messages
57
Reactions
36
Points
17
Location
Florida
Vehicle
2020 Explorer ST
Thread Starter #2
Removing Trim Panels to Access OEM Sub

Here's the panels that I removed to get access to the factory sub and wiring (and the fastener locations on the backs of the panels, so hopefully you won't break any!).

51.JPEG

20.JPEG

50.JPEG

32.JPEG

Pop out the ORANGE fasteners first. Then pop out the BLUE ones. Disconnect antenna at the GREEN ARROW. In this picture, the hole where the liftgate latches is at the TOP.


53.JPEG

Remove the rear arm rest first (ORANGE outline). Ignore the BLUE outline for now, we'll come back to that later.

34.JPEG

Remove by starting at the cup side. Pull up to pop out the fasteners. The 3 fasteners circled in ORANGE were very, very tight for me. So you may have to yank on these pretty hard. Say a little prayer to the Plastic Gods of ABS.

Once the panel is out, this will expose the 3rd row seat belt anchor bolt. 15mm I think it was. Unbolt it. Torque Specs for re-install: 35 lb. ft.

Note: There is a spot that looks like a fastener is missing, next to the yellow fastener. It's not missing, there isn't one there (which is why it isn't circled in the image). So don't sweat it.
 

Last edited:
OP
M
Messages
57
Reactions
36
Points
17
Location
Florida
Vehicle
2020 Explorer ST
Thread Starter #3
Removing Trim Panels to Access OEM Sub (continued)

Next is the D pillar:

52.JPEG

31.JPEG

Pop all the fasteners free circled in BLUE - but do NOT remove the 2 BLUE ARROW fasteners. Once all the other fasteners are free, slide the whole panel down, in the direction of the BLUE ARROWS. Those two fasteners will just slide out, you do NOT need to pull on them to remove. Don't forget to unhook the speaker at the GREEN ARROW.

Okay, now back to this guy. We are removing the BLUE outline.

53.JPEG

NOTE: The little cargo clip things - they do NOT pull out. They are in fact screws. Get some pliers with tape wrapped around the jaws, grab on the little cargo hooks, and then UNSCREW them like you would any normal screw. If you pull on them, you WILL break the little clips (and it still won't come out).

30.JPEG

35.JPEG

There are two silver cargo hooks located at the bottom of the panel (ORANGE ARROWS). Flip up the plastic cover from the bottom to expose the bolt that hold these in. Unbolt them. 8 or 10mm I think they were. Torque specs for re-install: 44 lb. in. (NOTE that is "lb. INCH", not lb. ft.). There are little captive washer things on the backs of these bolts, which makes it hard to tell if they are completely unbolted. Also, the captive washer might come off and fall down into the depths of the body seams. If this happens, no big deal. They aren't necessary.

The RED circle looks like there should be a fastener there, but on my vehicle there wasn't one.

The majority of the fasteners are along the top of the panel. Just go slow, popping them out. I started at the edges and worked towards the middle.

That's it for the panels to get access to the OEM sub. This is what you should be left with:

37.JPEG

38.JPEG

36.JPEG
 

Last edited:
OP
M
Messages
57
Reactions
36
Points
17
Location
Florida
Vehicle
2020 Explorer ST
Thread Starter #4
Removing Trim Panels for Signal Wire Routing

Okay. The next step is to route the high-level input speaker wire from the amp that is installed under the passenger seat all the way back to the OEM sub signal wires. I chose to route these back along the passenger sill plates, under the 3rd row seat, over to the OEM sub. To remove the 3rd row seat, it comes out with two bolts (18mm I think, Torque specs for re-install: 35 lb. ft.) and it weighs like only 5 pounds or so - it's surprisingly light.

Keep in mind that there is an airbag in the upper B pillar. I only popped off the lower trim panel and didn't mess with the upper portion/airbag. If you do decide to do that, be careful. You should also disconnect your battery. It's not necessary though for this install.

This where I started:

54.JPEG

I forgot to take a pic of the fasteners on the underside. Sorry about that. Using the picture above as a reference, there are two at the left most edge, two more along the middle towards the front, and then two more at the top of it next to the door. There are NO fasteners on the part that sits in the foot well.


55.JPEG

Remove the seat belt attachment cover (ORANGE outline) first. It just lifts up and out.


21.JPEG


It looks like I might have forgotten to circle the clip over there on the right side. Not sure, and I don't remember :( 
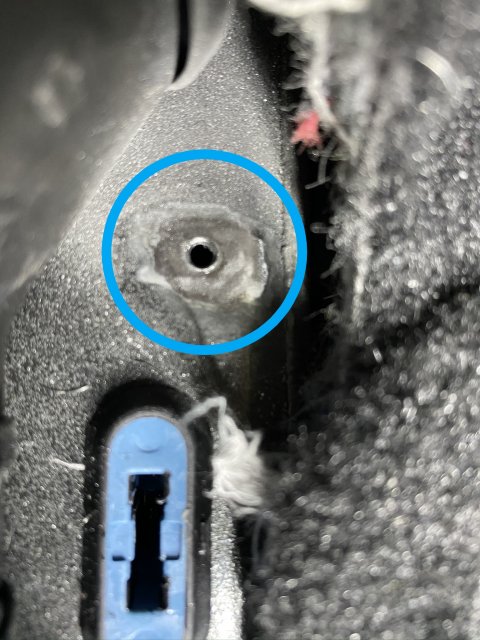
So just FYI, that might be a clip as well.

With that done, here's how I routed the wires. For the trim panels that I left in place, I just tucked the wire up under the edges. Follow the PURPLE line for my wire routing:

40.JPEG

41.JPEG

43.JPEG

42.JPEG

44.JPEG


45.JPEG

And Bob's your Uncle. That's it for input signal to the amp. I recommend leaving everything apart for now until you get the amp and everything hooked up and tested. Once you know it works. then we'll talk about reassembly.
 

Last edited:
OP
M
Messages
57
Reactions
36
Points
17
Location
Florida
Vehicle
2020 Explorer ST
Thread Starter #5
And Now for the Hard Part: the Amp Ground and Power Cables


First, we'll do the GROUND cable.

The Ground is the easiest of the two, so we'll start there. I'll show you where I put the ground, but you are welcome to put it wherever you want. Just make sure that it's a good ground to the chassis (this is a unibody vehicle), that you clear away any paint so there is bare metal contact, and that you make the Ground connection as SHORT as possible.

This is where I elected to install the ground. There's a nice flat spot exposed when the passenger sill panel is removed, and no plastic bits from the trim piece get in the way. The location is here (I added/drilled the hole at the BLUE ARROW):

22.JPEG


Make sure you grind away any paint, you want a nice shiny metal surface:

23.JPEG


Use a new, sharp metal drill bit. Drill your hole for whatever size self-tapping screw you have. I used a washer and an appropraitely sized self tapping screw that was just small enough to fit the Ground Lug:

24.JPEG


Okay, that's the Ground sorted. On to the hardest part of the install, the POWER.

For me, this was the worst part of the entire install. The challenging part was drilling a hole in the firewall to get the power cable through. I couldn't find any easily accessible existing rubber grommets that I could poke the cable through. I probably spent a good hour or 2 just searching for an acceptable, existing place to pass the cable through without drilling. I even took the wheel liner off to see if any good spots were hiding behind it. Spoiler: there weren't. The truck is sealed up pretty well. So. Drilling it was. Which sounds super scary but wasn't that bad.

The location to drill is located behind the battery, next to the cabin air filter inlet. To get to it, you have to remove the clips on the passenger side cowl and sort of tilt it up so you can see what you are doing.

NOTE: do be careful here. The FSM says that once the fasteners are removed, the cowl should just come off - this is another one of those spots that is very vague. I say be careful because my cowl (maybe yours is different) was very, very stuck to the base of the windshield. Like it wasn't going anywhere. Maybe there's a trick to remove it, I don't know. What I do know, however, is that water sheeting off the windshield travels across the seam, onto the cowl, and directed towards the drain holes, keeping the battery (and your cabin air filter) nice and dry. If you remove the cowl, this seal has now been broken. Is it easy to put back? I have no idea. So I didn't try to remove it. Instead, I sort of held it up, used my drill with an extension to reach the firewall, and poked me a hole.

The hole goes where the BLUE ARROW is pointing. Again, use a brand new, sharp drill bit specifically for metal. Trust me on this.

10.JPEG

Believe me when I say you are not spoiled for choice. The Explorer actually has two firewalls, the first is right behind the engine, but this is NOT the firewall that is right behind the dash. There's a cavity area where the battery is, fuse box, additional bracing, all kinds of stuff that make it pretty much impossible to get access to the firewall behind the dash. To the left of the battery is about the only clear spot - which is convenient I suppose considering that's where the power cable needs to connect. But you do not have a lot of room to work here.

I used my Ryobi drill and a Craftsman titanium nitride coated drill bit. I'm serious here. Do not use some old drill bit you have laying around. You will hate your life. Buy a brand new set if you have to. The set I used came with an extension (which you will need) - I started with a 1/8" hole and worked my way up in steps to the 3/8" bit. With those bits and the extension, my drill could just reach the firewall. You will see what I mean when you get access to this area and attempt to stick a drill in there. For what it's worth, this is drill bit set I used: CRAFTSMAN 21-Piece Assorted Titanium Nitride Coated Hss Twist Drill Bit Set at Lowes.com

To protect the power cable from sharp edges and to prevent leaks, I picked up a rubber grommet kit from Auto Zone - one of the grommets in there let the 8 gauge wire pass through, and the grommet fit tightly into a 3/8" hole.

I checked about a billion times to make sure there was nothing on the other side of the firewall that would get damaged if I drilled here - don't take my word for it, you should check, too. But if you use the same spot I did, you will be fine. Any other spot...and you better do a good job of checking. It is really tight up in the dash back there with the blower motor where it is.

To get access to the backside, where the cable will come through, you will need to remove the glove box. To do this, open it, pinch the tabs to at the back to get it to drop lower (like you are going to change the cabin air filter), and then remove the plastic check strap. There is a trick to this. Basically, you have to hold the box at the correct angle (don't let it go all the way down) and push up on the strap. You need to snap it out of it's slot; here's what it looks like:

11.JPEG


Now that's done, there are 5 LARGE screws that hold it in place (ignore the 2 smaller screws on the left and right sides) - remove them. Torque specs for re-install: 22 lb. in.

Once the screws are out, there are 5 clips holding it in place, - just pop it out like you have with other trim panels. Remember to disconnect the light connector, it's located on the back, bottom left. Just press the tab to release it.

Lastly, there's a carpet section that holds the LED ambient light - it's held in by two plastic push clips. Use your trim tools to remove it, disconnect the LED light (the connector about 6 inches away from the LED - it does not disconnect at the LED itself) and set it aside. You now have unfettered access to the bowls of the upper inner dash. You will notice 2 things:
  1. There is a LOT of stuff crammed up in that dash
  2. They covered pretty much everything with jute padding. You probably won't even see the firewall itself...until you go all the way up to the back side of where I showed you to drill. The jute just ends right about there.

This is roughly the spot you will be looking at for your hole you drilled (or cable, if you've already pushed some through) - check around the area where the BLUE circle is (but behind it, on the firewall, obviously):

12.JPEG

Yup, back up in there, behind all that stuff where the BLUE circle is...

13.JPEG

Ayup. Back up in there. I couldn't even get a good picture of it. Just move the passenger seat as far back as it will go, get a good flash light, and stick your head up under there. To help you locate the area where the drill will come through, there is a rubber hose that passes through (up and to the left of the external firewall image) - you can see this hose on the outside, the grommet where it passes through the firewall, and you can see it/find it on the inside. Just be careful when drilling, you obviously don't want to damage it.

And here is the cable installed, in addition to the rubber grommet, I also used some black RTV and rubbed that around the area where the cable enters the grommet to be super sure I got a good seal:

14.JPEG

And that's it. The cable is now inside the cabin. Route it however you want. I took it down along the passenger side towards the passenger sill (which we already removed), ran it down to parallel with where the amp was, tucked it under the carpet there and ran it over. The carpet under the seat is already in multiple layers, it's not all one piece. You'll see when you get the seat out. It was pretty easy to run the cables and wires under the carpet, and pop it out to get to the amp. I did some cable management with some ribbed plastic hose protector, some electrical tape and zip ties to keep everything neat and tidy.

Test it out. Assuming it works as expected, reassembly is done in reverse of everything you did to get here. Just be patient with the plastic fasteners, and make sure they are seated properly in the trim panel before you try to reattach it. Sometimes they slide out a little or might have popped out. Take your time, and you'll be good to go.
 

Last edited:
OP
M
Messages
57
Reactions
36
Points
17
Location
Florida
Vehicle
2020 Explorer ST
Thread Starter #6
And That's It!

As for the subjective part...I think it sounds really great. I wasn't all that impressed with the OEM sub. I don't need to rattle windows or anything, but I do like a little more down low. I debated just replacing the OEM sub with something else, but the issue ultimately would have been the OEM amp driving the sub - it probably wouldn't put out enough wattage. So, if I'm looking at a new amp anyway, I may as well just do the whole thing. Let the OEM sub handle some aspects of the music, and whatever low frequencies it was struggling with, the JL Audio would make up for it.

Overall, I think it sounds great. The RF amp has a remote bass adjust that I have sitting in the arm rest console. It's currently set at like 3 or 4 out of like 10 (or 11...it goes to...11?). So set pretty low. And it sounds really good. And I guess if I wanted more thump, I could just turn it up. The JL Audio sounds really good for a shallow sub. I wanted it to take up as little room as possible back there because I actually use the Utility portion of SUV and need the space.

I'm happy with the sub, and I love RF products and have used RF amps in the past, and this one does not disappoint. Especially for such a small footprint. At any rate...yay!
 

Last edited:

Toadster

Member
Law Enforcement
Messages
307
Reactions
180
Points
37
Location
Folsom, CA
Vehicle
'23 ExST, '17 Raptor, '16 FoST, FFR Cobra
#7
fantastic writeup and pics/steps, etc!
 

AMineoST

New Member
Messages
9
Reactions
0
Points
1
Location
Orlando, fl
Vehicle
2022 Ford Explorer ST
#9
Amazing write up worked like a charm. One issue I had though when my volume is up over 20 the amp /sub seems to be losing base sometimes for a few seconds or more. Is this happening too anyone else? Not sure if it's the car or the amp. When I'm parked I don't see the issue :(.

Also did you ever upgrade the amp of the factory surround speakers? I wish I had a bit more volume.

I went with a JL 12w3v3 and JL jx500x1 in place of my spare(did not want to lose any trunk)
 

Messages
115
Reactions
22
Points
17
Location
Bridgewater, New Jersey
Vehicle
2022 Ford Explorer ST
#11
Mcglsr2 , wow great help for us looking to upgrade . This is gonna be a huge amount of help! Thank u brother !!!!!


Top